نوشته شده توسط : lily


Obdstar odometer correction tools can help you greatly in mileage correction.This aryicle is compare their difference and similarities.

OBDSTAR-ODO-Master-VS-OBDSTAR-DP-Plus-VS-OBDSTAR-X300M-1

OBDSTAR Odo Master highlights:
*   tablet design:data graphing can be more visible
*   wider and newer vehicle coverage:more chances to repair diverse vehilces
*   online one-click update:save money and energy to keep updated
*   user-friendly on-screen instruction
*   read and write mileage via OBD

Difference:
Supported vehicle car list:: obdstar dp plus > obdstar Odo Master (only mileage correction) > obdstar x300m
Vehicle year coverage (from newest to older): obdstar dp plus = obdstar Odo Master > obdstar x300m

Price:  obdstar dp plus -600 usd
= obdstar Odo Master
=OBDSTAR X300M + 580usd

Notice:

OBDSTAR DP PLUS has 3 package.This comparision cites the price of Obdstar dp plus package A.

To check their difference,pease check the product overview:

OBDSTAR X300 PAD2 X300 DP Plus

Obdstar odo master has 3 version. This comparsion cites the price of Obdstar Obo Master Full version.

To know their difference ,please check my previous article:
Obdstar Odo Master Full/Standard/Basic Verison Comparision
Update: one – click upgrade:obdstar Odo Master = obdstar dp plus
obdstar x300m has less updates these days.

Similarities:

all are best OBD mileage programmer.

To make it easy to understand,the relation of these 3 products  can be shown below:

OBDSTAR-ODO-Master-VS-OBDSTAR-DP-Plus-VS-OBDSTAR-X300M-2

To check their support car list,please check below:

OBDSTAR-ODO-Master-VS-OBDSTAR-DP-Plus-VS-OBDSTAR-X300M-3


:: برچسب‌ها: OBDSTAR DP PLUS ,
:: بازدید از این مطلب : 152
|
امتیاز مطلب : 0
|
تعداد امتیازدهندگان : 0
|
مجموع امتیاز : 0
تاریخ انتشار : دو شنبه 15 دی 1399 | نظرات ()
نوشته شده توسط : lily

Even for the best vehicle diagnostic tools, errors are always hard to avoid. So people present some problems to us after they buy the GM Tech2. And today I wanna pick 3 main troubles here and give the answers to other people who have bought the tool.

The first question is that after you bought it, you may meet the condition that the TIS2000 software can’t be installed and no identification.

Don’t worry, if the TIS2000 you are trying to install has contained in the GM Tech2 software, then install the TIS2000 software is useless. To program electronic control unit, you would better buy an extra TIS2000 to work with the GM Tech2.

The second question is that find some errors after receiving the GM Tech2.
When you meet this trouble,the first thing you should check is that if it is blue screen. If it is, then just replace the Blue Screen Chip is ok. If it is not the problem of Blue screen, please send the seller the self-test report to check where the problem is. If you don’t know how to operate self test, you can consult the self-test manual at GM TECH2 “technical support / service”.

Once the tool starts to smoke, and even your car voltage become 14V from 12V when you use the GM Tech2 for the second times, please follow the right operation steps as what I say. Before you start diagnosing, please turn on the ignition and then connect the GM Tech2 with your vehicle, you would better test the voltage when the car starts , because during this process, a part of vehicle’s voltage will reach up to 24V or higher, especially for the vehicle which has a poor contact of electrical ground.


:: برچسب‌ها: gm tech2 ,
:: بازدید از این مطلب : 145
|
امتیاز مطلب : 0
|
تعداد امتیازدهندگان : 0
|
مجموع امتیاز : 0
تاریخ انتشار : دو شنبه 15 دی 1399 | نظرات ()
نوشته شده توسط : lily

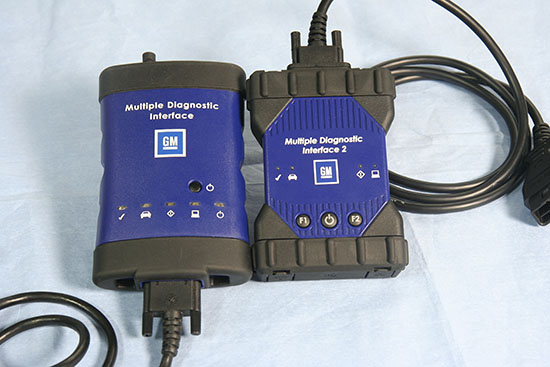
The next generation of the J2534 GM Multiple Diagnostic Interface, or GM MDI 2(Fig. 1, right), offers increased processing power and security than the original MDI (Fig. 1, left) for faster programming speeds on current Global A vehicles as well as future Global B vehicles. The compact communication module is required in order to manage the transfer of data between a vehicle’s onboard network and a service technician’s PC.

The-Next-Generation-Multiple-Diagnostic-Interface-The-MDI-2-1

The MDI 2 supports diagnostic applications — GDS 2, Data Bus Diagnostic Tool, and Tech2Win — as well as Pass-Thru programming applications — TIS2Web–SPS.

Enhancements to the tool were based on technicians’ feedback on how they use the MDI and how to improve it. It replaces the first generation MDI, introduced in 2007, for Pass-Thru programming on current GM models. The MDI 2 is backward compatible, so it can be used to perform Pass-Thru programming on all vehicles built since 1996.

The MDI 2 connects to the vehicle via the J1962 connector using a new DLC cable. Connection between the GM Diagnostic Tool MDI 2 and the PC running the Global Diagnostic System 2 (GDS 2) software can be accomplished via standalone (USB), through a new Point-to-Point wireless Wi-Fi interface feature (a simple plug & play), or through the dealership network (Ethernet or wireless).

MDI 2 Kit

The EL-52100 MDI 2 kit includes:

*   MDI 2 Unit
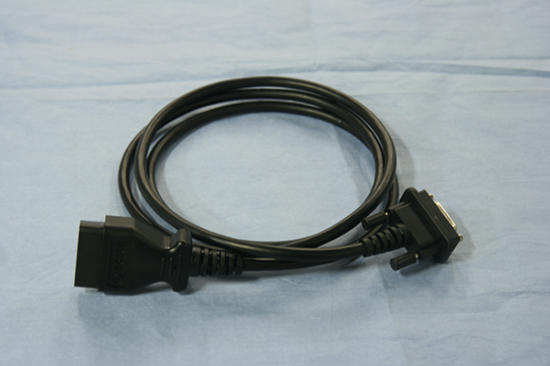
*   SAE J1962 DLC Cable (Fig. 2)
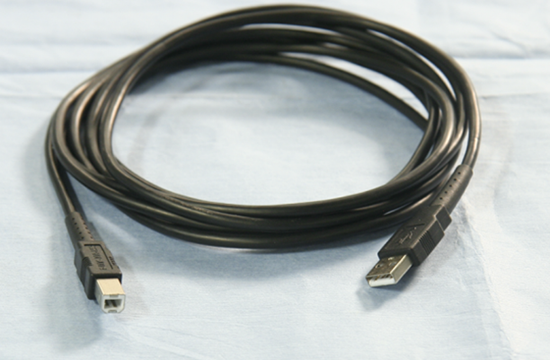
*   10-ft. USB A to USB B Cable (Fig. 3)
*   Ethernet Cable
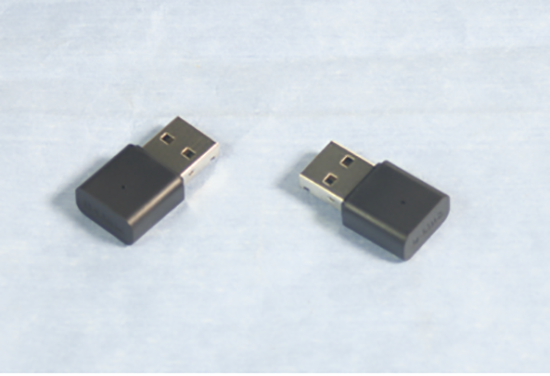
*   D-Link Wireless USB Adapters (Dongles) (Optional; for wireless connection)

The-Next-Generation-Multiple-Diagnostic-Interface-The-MDI-2-2
The-Next-Generation-Multiple-Diagnostic-Interface-The-MDI-2-3
The-Next-Generation-Multiple-Diagnostic-Interface-The-MDI-2-4

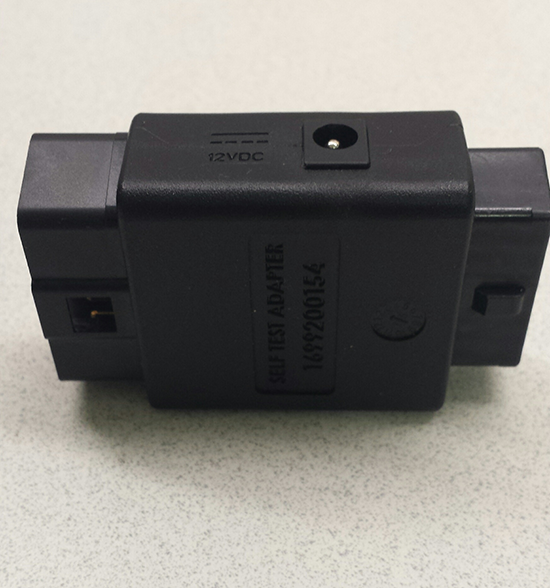
A DLC Cable Self-Test Loopback Adapter (Fig. 5) was sent to dealerships as an essential tool in December. It’s compatible with the MDI and MDI 2. It’s also sold separately through GM Dealer Equipment.

The adapter is used to test the DLC cable for open wires when used with the MDI Manager software. The adapter also can be used to power the MDI or MDI 2 on the workbench.

The-Next-Generation-Multiple-Diagnostic-Interface-The-MDI-2-5

MDI 2 connections
A. USB Port Type A
B. DB26 Connector (DLC Cable)
C. USB Port Type A
D. USB Port Type B – PC Connection Port
E. Wireless Adapter (Dongle)
F. Ethernet Port

The-Next-Generation-Multiple-Diagnostic-Interface-The-MDI-2-6

New Features
*   Wi-Fi Connection – The USB Wi-Fi adapter uses a USB dongle that enables Point-to-Point connections without the need for Wi-Fi SSID information or a wireless router.
*   USB Connection – Uses a new, more secure Type B connector and Ground Offset Failure protection. A wired connection is recommended for longer programming events.
*   Power Source – The MDI 2 is powered from the vehicle battery via the DLC Cable. It may also be powered over USB to perform firmware updates only using a PC.
*   Power Backup – Internal batteries that were used in case of a power interruption have been removed, which eliminates the possibility of old batteries corroding over time and damaging the unit. Capacitors maintain power during engine cranking, so operation is maintained.
*   Firmware Download – Uses USB 2.0 for faster firmware downloads instead of a separate AC power supply.
*   Future Expansion – Additional USB ports, an SD memory card slot and Function buttons are built into the unit for future enhancements.
*   Operating Temperature Range – The temperature range has been extended to -20° to 70°C (the MDI range was zero to 50° C).
*   DLC Cable – The DLC cable is twice as long as the previous cable and connects at the top, making it easier to use. The cable only connects to the MDI 2. A self-test adapter (accessed through the MDI Manager) can be used to test the integrity of the cable.

MDI Manager Software

The MDI Manager must be installed on the PC in order to configure, update and run diagnostic applications targeted for the PC.  Initially, use the MDI Manager software to set up the configuration of the MDI 2. The MDI Manager is also used to update the firmware on the MDI 2. Visit the TIS2Web/GlobalTIS website to determine if a newer version of MDI Manager software is available.

Wireless Dongle Setup

The first time the MDI 2 is used, the point-to-point USB dongle must be paired with the PC, which will install the necessary drivers on the computer. One dongle should be plugged into the PC and one into the MDI 2. The dongles are identical. Use either one for either connection. Remove the bottom dust cover to access the port.

TIP: Do not plug the dongle into a USB hub. It must be plugged directly into the computer.
The-Next-Generation-Multiple-Diagnostic-Interface-The-MDI-2-7

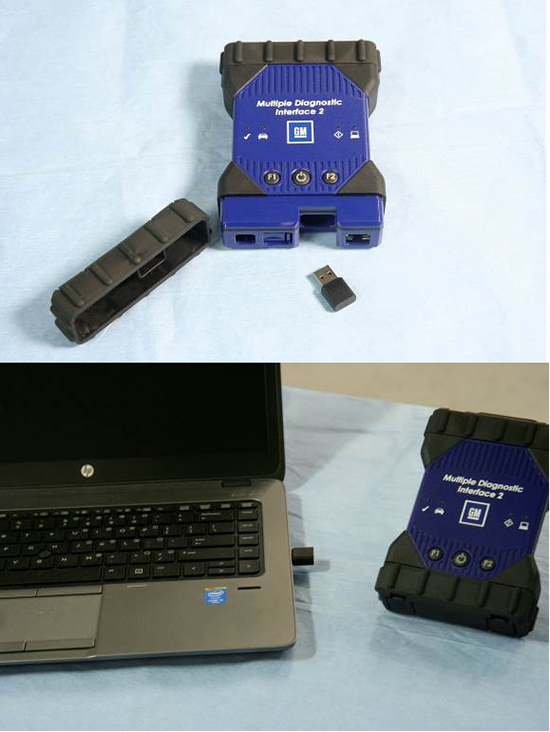
Connect the MDI 2 to the PC via the USB cable. After starting the MDI Manager, the Point-to-Point connection is automatically configured. The USB dongles are intended to stay plugged into the PC or laptop at all time. If it must be removed, safety eject it by right-clicking on the Windows USB icon in the bottom right toolbar on the computer.

Dealerships considering new purchases should look into the MDI 2 for its many new advantages The original MDI will continue to be supported, but will not work on future Global B models.


:: بازدید از این مطلب : 159
|
امتیاز مطلب : 0
|
تعداد امتیازدهندگان : 0
|
مجموع امتیاز : 0
تاریخ انتشار : یک شنبه 7 دی 1399 | نظرات ()
نوشته شده توسط : lily
Toyota-MIL-880x660

Some 2014 – 2016 model year Highlander HV, 2015 Tacoma, 2015 – 2016 Venza, 2015 – 2017 4Runner, Avalon, Camry, and 2016 – 2017 Avalon HV and Camry HV vehicles may exhibit a MIL “ON” condition with Diagnostic Trouble Code (DTC) P2610 (ECM/PCM Engine Off Timer Performance) present.More repair Toyota case,please check it here:Toyota Trouble Repair

The Engine Control Module (ECM) (SAE term: Powertrain Control Module/PCM) logic has been modified to reduce the possibility of this condition. Follow the Repair Procedure below to address this condition.

Repair Procedure

Step 1.Using Techstream(Toyota TIS tool), check for the following stored DTC: P2610 – ECM/PCM Engine Off Timer Performance. Is the DTC present?

YES — Continue to step 2.

NO — This bulletin does NOT apply. Continue diagnosis using the applicable Repair Manual.

Step 2.Check for the Authorized Modifications Label affixed to the vehicle in the location shown below. Confirm if the ECM (PCM) calibration has been updated. Is the calibration ID listed the latest ECM (PCM) calibration?

YES — This Service Bulletin does NOT apply. Continue diagnosis using the applicable Repair Manual.

NO — Continue to step 3.


Step 3.Flash reprogram the ECM (PCM).

Step 4.Prepare and install the Authorized Modifications Label.
A.Using a permanent marker, enter the following information on the label:

ECM part number [Refer to the Parts Information section for the NEW PART NUMBER]
Calibration ID(s) [Refer to the Calibration Information section for the NEW CALIBRATION ID]
Dealer Code
Repair Date
Change Authority [This bulletin number]
B.Install the Authorized Modifications Label to the vehicle at the location shown above

The Authorized Modifications Label is available through the MDC, P/N 00451-00001-LBL.

Step 5.Test drive the vehicle to confirm proper vehicle operation.


:: برچسب‌ها: Toyota TIS tool ,
:: بازدید از این مطلب : 177
|
امتیاز مطلب : 0
|
تعداد امتیازدهندگان : 0
|
مجموع امتیاز : 0
تاریخ انتشار : شنبه 6 دی 1399 | نظرات ()
نوشته شده توسط : lily

Are you looking for the best possible tool for your Allison Transmission Diagnostic needs?

The NEXIQ USB Link 2 is the most popular adapter, and it has been tested & certified to work with the Allison DOC software.

The Allison DOC Software version 8.4.
The Allison DOC Software provides you “dealer level” diagnostics. The software never expires, and there are no annual renewal fee’s.

Here are some things you can do with it:
1.Reset adaptive shift
2.Parameter and feature adjustment
3.Accurate problem diagnosis
4.Complete wiring diagrams and sensor location maps
5.Step-by-step troubleshooting information
6.Fault tree information
7.Fault code and symptom based diagnostics
8.Transmission diagnostic tests
9.Reset maintenance indicators
By the way, NEXIQ-2 USB Link Packed Software and Application with these.
– Allison (Included!)
– Bendix 6.3.8.0 (Included!)
– Detroit Diesel DDDL 7.05 ((Included!)
– Detroit Diesel DDCT (Included!)
– Detroit Diesel Calibration Tool (Included!)
– Eaton Service Ranger 3.2 (Included!)
– International DLB (Included!)
– International ICAP, IPTS, NETS, IPC (Included!)
– International Master Diagnostic (Incluided!)
– Meritor and Wabco Diagnostics (Included!)
– Cummins Insite 7.5 (Included!)
– Hino 2.0.2. (Included!)
– Caterpillar 2.0.1.0 (Included!)
– Perkins EST 2010B (Included!)
– V Macks 2.6.12 (Included!)
– V Macks Dealer Pro (Included!)
– Volvo VCADS 2.35.10 (Included!)
– Toyota Techstream for car (Included!)

The Nexiq 2 kit includes:
NEXIQ-2 usb-link  main interface
441013 ; OBD II Adapter
444009 ; J1962 OBD II Adapter
402048 ; 6- and 9-pin Deutsch Adapter
442022 ; Volvo 14-Pin Adapter
442020 ; Volvo 8-Pin Adapter
442021 ; Komatsu 12-pin Adapter
448015 ; CAT 9-Pin Adapter
441033 ; 3-pin Deutsch Adapter(with male and female connector)
USB cable
CD


:: برچسب‌ها: Nexiq USB Link 2 ,
:: بازدید از این مطلب : 178
|
امتیاز مطلب : 0
|
تعداد امتیازدهندگان : 0
|
مجموع امتیاز : 0
تاریخ انتشار : شنبه 6 دی 1399 | نظرات ()