نوشته شده توسط : lily

Lan Connect Operation Details
1. Connect the LAN cable to ICOM A1/ICOM A2, another side to laptop LAN port
2. Connect OBDII cable to car OBDII Port; sometimes you might need the external OBDII cable.
3. Insert the USB KEY to laptop USB Port and power on the laptop
4. Input the password: BMW ICOM (all Capital letters) and press “Enter” to continue.
5. Wait the software well loaded (The red letters disappear and the offline day appears)

20-1 20-2

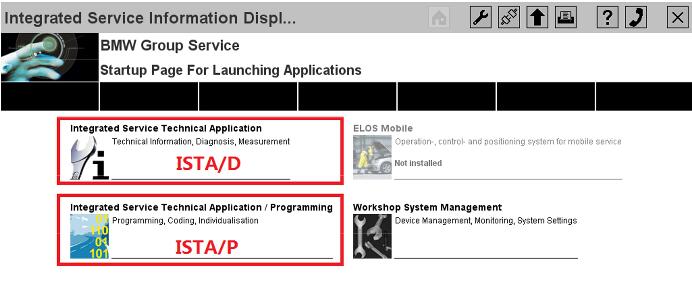
6. Choose ISTA/D or ISTA/P to enter the diagnostic or programming software.
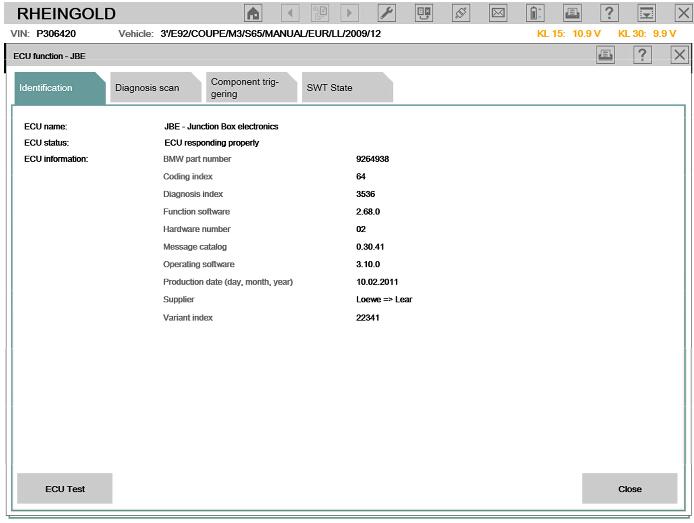
7. For ISTA/D Choose [Vehicle identification] and choose read out vehicle data or start vehicle
test to diagnostic with cars.

20-3

8. For ISTA/P choose [Create new session], then choose the free icom, it will read out all the
vehicle’s information and modules one by one.

Wireless Connection Details
1. Power on the router firstly, till the green LED is flashing on the router. (Important)
2. Connect the ICOM A1/ A2 to car OBDII port via the OBDII cable and make the ignition on.
3. Wait till the ICOM A1/ A2 WLAN LED is light up and flashing (around 10 seconds or so)
4. Insert the USB KEY to laptop USB Port and power on the laptop
5. Input the password: BMW ICOM (all Capital letters) and press “Enter” to continue.
6. Wait the software well loaded (The red letters disappear and the offline day appears)
7. Choose ISTA/D or ISTA/P to enter the diagnostic or programming software.
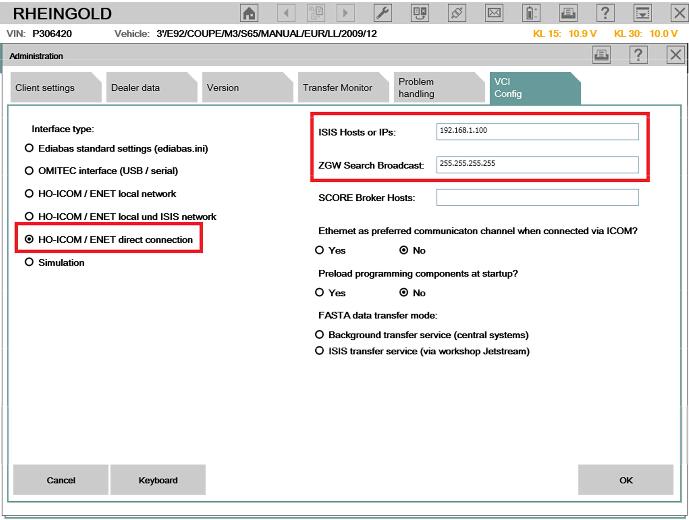
8. For ISTA/D Choose firstly, then choose [VCI Config], check the IP address like this:
192.168.1.100 / 255.255.255.255
9. The interface type must choose [HO-ICOM/ENET direct connection], click save and close the
window.

20-4

10. Choose [Identification] then choose [Read Out Vehicle data], then choose [Start Vehicle
Test].

20-5

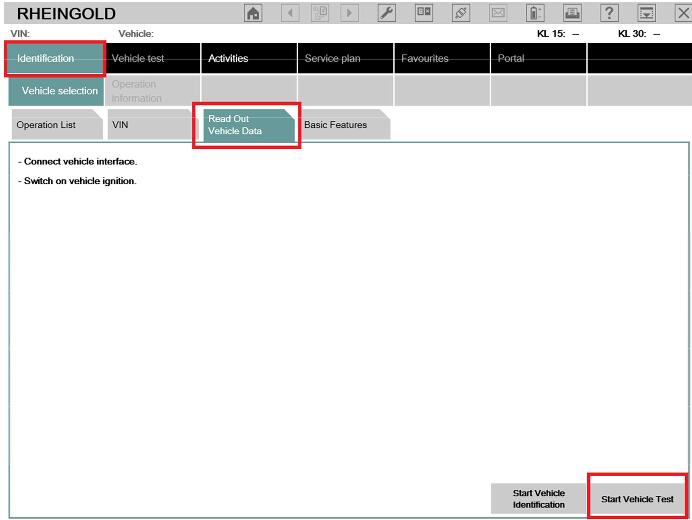
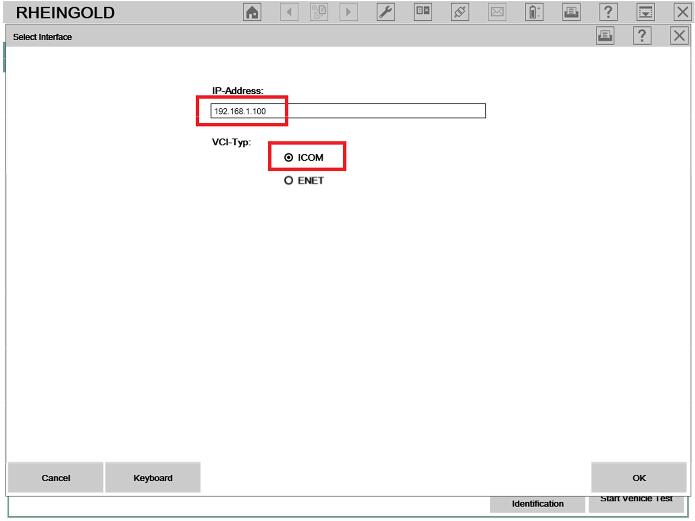
11. At the popup screen, please confirm the IP address is [192.168.1.100] and choose [ICOM],
and then system will read out all the car information and modules one by one.

20-6 20-7 20-8

NOTICE:
1. All the internal settings are well configured, please DO NOT change settings, this might lead
the software not working.
2. Switch between LAN and WLAN, you need plug off the OBDII cable from car and re-plug in
(Make the ICOM A1/A2 multiplexer restart)
3. Please keep your laptop/ Routers with stable power when using.
4. If you cannot diagnostic with cars by WLAN, please make sure the router is powered on and
restart the laptop to try.
5. All operations must base on the software well loaded! (red letter disappear and offline day
appear)


http://wholesaleobd2.net/2018/08/07/how-to-use-bmw-icom-a2/


:: بازدید از این مطلب : 306
|
امتیاز مطلب : 0
|
تعداد امتیازدهندگان : 0
|
مجموع امتیاز : 0
تاریخ انتشار : یک شنبه 28 مرداد 1397 | نظرات ()
نوشته شده توسط : lily

Here’s the working solution to Lonsdor K518ISE Key Programmer abnormal display after upgrade.

Problem: Click “Immobilizer” button after updating the device, it skips to below interface:

20-1

Solution:

Step 1: After rebooting the device, please press and hold the setting and return buttons(in below red box) simultaneously for few seconds..

20-2

Step 2: The following interface appears, please click “uninstall APK” button in the red box, and wait for few seconds.

20-3

Step 3: It skips to below interface, please click “OK” to continue.

20-4

Step 4: The following interface appears, please click the button in the red box to install factory-set/default APK.

20-5

Step 5: Please wait for about half a minute. The factory-set APK is installed and initiates automatically. Then input the password on boot, and click “OK”. It skips to below interface, click “update” in the red box. Remember to reboot the Lonsdor K518 Auto Key Programmer after updating. You can use it normally now.

20-6

http://obd2codes.net/2018/08/02/how-to-solve-lonsdor-k518ise-abnormal-display-by-factory-resetting/


:: برچسب‌ها: Lonsdor K518ISE Key Programmer,Lonsdor K518ISE,K518ISE,K518ISE key programmer,Key Programming Device,Key Programming tool,Best Programming tool, ,
:: بازدید از این مطلب : 312
|
امتیاز مطلب : 0
|
تعداد امتیازدهندگان : 0
|
مجموع امتیاز : 0
تاریخ انتشار : یک شنبه 21 مرداد 1397 | نظرات ()
نوشته شده توسط : lily

07.2018 Xentry Mercedes SD Connect c5 software update manual for newbies:

Important:

If you have XDOS 2018.3 or  2017.9 not working well, you should update it to version 2018.7

If you have XDOS 2018.5 works good, it’s not necessary to update to 2018.7

You should have:

Xentry_Kit_09_2017.iso(copy to the folder:  iodd 2541 _ISO)

U disk with a Windows machine

IODD 2541

23-1

Panasonic power adapter

23-2
C5 mux

23-3

C5 mux in a standby mode

connect the Panasonic power adapter to Xentry C5

insert IODD 2541 into the USB port on C5

23-4
23-5

in a standby mode, press “X” and “√” at the same time, then it will pop up Start Update?”

(if not, it will pop up “Start XENTRY Connect?”. then, when the prompt disappears, it will display “Start Update?”)

23-6

When you see “Start Update?”, press “√” and C5 will go into the update mode and IODD 2541 will light up

Press button “5” on IODD 2541 as soon as possible. then, the cross “X” will turn a circle “O”

23-7
what’s displayed on C5:

23-8
23-9

It will take 50-55 minutes to finish the whole XDOS installation

The system restarts after installation completes

23-10

If your system fail to start, turn off C5 mux and restart again

When C5 starts, take out the hard disk on C5 and install it into the laptop (here: Dell 55220)

Before it, pls install the Windows machine on the U disk

23-11

Press F12 when you see the pop-up “F12 Boot Options”

23-12

Select USB Storage Device and press “Enter”

23-13

Pop up the interface, and select [03]

23-14

Go to the PE system and create an user account

23-15
23-16
23-17

Note that Windows should be located in disk D:

23-18

After path selection, right click on “Create a new admin account” on the left

23-19

User name: C5, Password: abc12345678
(You can have any user name and password you want)

23-20
23-21

Click on Ok

Close the application

Turn off the laptop

Take out the disk off the laptop and install it into C5 multiplexer

Done!

http://cheapobd2tool.com/2018/07/27/how-to-update-xentry-connect-c5-software-with-iso-file/


:: برچسب‌ها: xentry, star tool, starscan tool, stardiagnos, star diagnoses, stardiagnosis, mercedes star, mercedes star diagnostic, ,
:: بازدید از این مطلب : 547
|
امتیاز مطلب : 0
|
تعداد امتیازدهندگان : 0
|
مجموع امتیاز : 0
تاریخ انتشار : جمعه 12 مرداد 1397 | نظرات ()
نوشته شده توسط : lily

This is how to set up Router or DHCP server for BMW KOMBI and NBT programming with Enet e sys cable or ICOM A2 Ista-p.

18-1
Why LAN cable connection better than WLAN from rounter to PC:

Because ista P does not support wlan connections. Probably due to stability liability.

Ista p does not support wifi (wlan) and will not start ista p server if the wifi is enabled on the laptop, only ista p client will open and you cannot select istap server to program. Imagine if the wifi connection drops during programming then the car is screwed up. There are good reasons why bmw doesn’t allow programming via wifi

How to use the Router programming:

ICOM and computer must be connected through a router with DHCP server enabled. no direct connection laptop -> icom.

But you don’t have to use a router. But you do need a DHCP server running on the laptop on the ethernet interface.

It’s pretty easy,

1) Set a static IP on the Ethernet (not wireless) interface – I use 192.168.254.1
2) Install DHCP server (http://www.dhcpserver.de)
3) Configure DHCP server to listen on the Ethernet interface
4) Click on the buttons to set firewall ports and run as service
5) Connect up your ICOM Scanner and it’ll get a DHCP address from the DHCP server

Then you can program everything without faults.

I use this on multiple ISPI laptops and never had an issue and never needed a router to connect the computer and ICOM to.

This is a customer share of configuration that worked flawless:

Router DHCP, Icom DHCP and Windows Ethernet: automatic dhcp
First of all the ICOM A2 should be configured this way:

ICOM Config

ConnectionMode = STATIC_IP
Ip = 192.168.68.85
Netmask = 255.255.255.0
Gateway = 192.168.68.99

DHCPSRV.INI
[SETTINGS]
IPPOOL_1=192.168.68.1-254
IPBIND_1=192.168.68.99
AssociateBindsToPools=1
Trace=1
DeleteOnRelease=0
ExpiredLeaseTimeout=3600

[GENERAL]
LEASETIME=86400
NODETYPE=8
SUBNETMASK=255.255.255.0
NEXTSERVER=192.168.68.99
ROUTER_0=192.168.68.1

[DNS-SETTINGS]
EnableDNS=0

[TFTP-SETTINGS]
EnableTFTP=0
ROOT=C:\Users\Osx\Desktop\DHCP\wwwroot
WritePermission=0

[HTTP-SETTINGS]
EnableHTTP=0
ROOT=C:\Users\Osx\Desktop\DHCP\wwwroot
[00-01-A9-00-EE-E9]
IPADDR=192.168.68.1
AutoConfig=06/26/2016 12:41:32
Hostname=ICOM1120134
LeaseEnd=1467070189

Windows Ethernet config:

“Use the following IP Address”
IP 192.168.68.99
Subnet mask 255.255.255.0

BMW ICOM or ENET cable: which better for flash

There are problems with both ICOM and ENET. ENET can’t flash all ZGW modules and ICOM can’t flash any NBT units (including all other control units in MOST bus like KOMBI, AMP and so on). Fix is the same for both, use DHCP server to assign IP adresses. With ENET you can flash NBT even without DHCP server and with ICOM you can flash ZGW without DHCP server. You can even flash whole car without DHCP server by first flashing the ZGW with ICOM and then flashing the rest with ENET.

I meant that ENET is no worse than ICOM, and very very likely original ICOM is no worse than ENET. Anyway the difference is academic. Chinese cloned ICOM’s can be worse than ENET. New original ICOM Next costs around 510 euros, I think that there is no different between it and ENET in reliability. I don’t even remember when I last time used ICOM for F-series flashing, it was over a year ago anyway.

KOMBI and NBT programming review:

I flashed several F10,F20 with 3.56.4 and ICOM A2 through dhcp and its working well.
MOST connection will be used in Exx series, i flashed also some R56 and many E91 with most connection.

Just add a router and connect the icom to it and offcourse your laptop to the router.
Open a browser and type: ip address of your icom:60080 (User name: root Password: NZY11502) and change lan setting to dhcp. Reboot icom and check with iToolRader the new ip address of your icom. It should be 192.168.x.x
Fire up ista-p and do your coding.

https://wallinside.com/post-64468878-ford-vcm2-ids-error-code1100-851082-when-pcm-reprogramming.html


:: برچسب‌ها: bmw icom, bmw icom a2 for sale, bmw icom a2, icom bmw, icom a2, bmw icom software, bmw a2, icom a, bmw icom a2+b+c, ,
:: بازدید از این مطلب : 349
|
امتیاز مطلب : 0
|
تعداد امتیازدهندگان : 0
|
مجموع امتیاز : 0
تاریخ انتشار : جمعه 5 مرداد 1397 | نظرات ()
نوشته شده توسط : lily

How to install Ford IDS 109:
1- Install the ids 86 before changing the date to 1 07 2015
(hold the date 1/7/2015 , until you finish step 5
every time you restart your computer, check the date, if it is  on 1/7/2015)
2- install patch ( choice option 2 )
3- Make a backup of your windows system (I recommend, this is optional)
4- Open the program with the interface connected ,,( choose NON DEALER,when open program for first time ) , keep vcm turn on,on the computer.
5 – create a restore point,,,then turn off vcm of the computer
6 – Okay, now install the new version, v109.01, before installing, changing the date of your computer, to the current day
7- After installing, go back to the restore point, which you created in step 5, activate this restore point, and then open the program
8- Finally, install FordExtendProgram  (click right mouse button click on, run as administrator)

Done, will work in the new version

Ps. here’s solution of “VCM II-IDS software version mismatch (update IDS) ”

10-1

Click green Tick box to update firmware.
If it does nothing, <=Perform VCMii reset . Unplug USB cable from end Ford VCM II take off black rubber end boot plug back in USB restart IDS hold BUTTON middle end VCM plug in to PC all lights flash and and when VCM beeps release button IDS will prompt VCM update to IDS level press Tick


:: برچسب‌ها: FORD VCM,VCM FORD,VCM 2,VCM II FORD,Ford VCM 2,Ford VCM II,Ford VCM IDS,Ford IDS,IDS Ford,ford ids software,ids scan tool, ,
:: بازدید از این مطلب : 424
|
امتیاز مطلب : 0
|
تعداد امتیازدهندگان : 0
|
مجموع امتیاز : 0
تاریخ انتشار : دو شنبه 1 مرداد 1397 | نظرات ()