نوشته شده توسط : lily


Autel Maxisys Pro MS908P/Maxisys Elite/Maxisys MS908/MS906/MS906TS/MS906BT/DS808Kit one year Update Service

Features:

If your any autel product is over warrantry for free update, you can buy this service to get update online. Available for All the Autel

product which over 1 year online update. How to extend your scanner update time?

If your Autel device need update,please contact us(sales@obd2tool.com):

1.Please tell us your device model,eg:MS908P

2.Please tell us your device S/N,eg:SN V09G60100000

After receive the update fee, we will provide a year software update online service.

Why buy update service from us? we offer better price than others.

We offer autel maxisys update cost better than others

Product Model          


Our Update Price


Market Update Price        


 Maxisys Pro

 $798


$1,295.00

 Maxisys MS908CV

 $985


$1,295.00

 Maxisys MS908

 $695


$895.00

 Maxisys MS906TS

 $648.  $795.00

 Maxisys

MS906BT

 $585

 $695.00
 Maxisys MS906  $398

 $495.00

 Maxisys MS905  $450  $695.00

 Maxidas

DS808

 $308

 $349.50
AUTEL Maxicheck MX808 $180

$299

AUTEL

Maxicheck MX808 TS


$200

$349.50
 AUTEL TS608  $200

 $349.50

 MaxiSys Elite $938


$1,295.00


:: بازدید از این مطلب : 389
|
امتیاز مطلب : 6
|
تعداد امتیازدهندگان : 2
|
مجموع امتیاز : 2
تاریخ انتشار : سه شنبه 16 ارديبهشت 1399 | نظرات ()
نوشته شده توسط : lily

This instruction show you how to use Scania XCOM diagnostic software to reset an ECU.Please perform the follow steps.

Procedures:

1) Connect to CAN (see use case “Connect to CAN”) if not already connected.

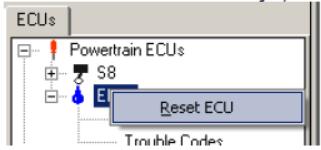
2) Display the ECU pop-up menu either by clicking the ECU node in the ECU explorer tree with the right-side button on the mouse or pressing the ”pop-up” key when the related ECU is selected (which is done with the arrow keys).

How-to-Use-Scania-XCOM-Reset-an-ECU

3) Pressing ”OK” will reset the ECU, close all open windows and redraw the tree of ECUs. The Auto ECU Programmer is reset with “keyOn”.

4) The sequence is now complete.


:: برچسب‌ها: Auto ECU Programmer ,
:: بازدید از این مطلب : 395
|
امتیاز مطلب : 0
|
تعداد امتیازدهندگان : 0
|
مجموع امتیاز : 0
تاریخ انتشار : یک شنبه 31 فروردين 1399 | نظرات ()
نوشته شده توسط : lily

Here is instruction show you guide on how to use Obd2 diagnostic tool ASIST diagnostics to reprogram OCS control unit for Nissan Sentra.

IMPORTANT: Seatbelt buckle bracket MUST be installed before OCS Control Unit Reprogramming is performed.

NOTE: In this Service Procedure, OCS is sometimes referred to as ODS.

How to Install Nissan ASIST Diagnostic System Software

Steps:

1.Install the driver for the J-51594 OCS reprogramming cable as follows:

a.Keep the PC connected to the internet.

b.Connect the J-51594 OCS reprogramming cable to the PC USB port.

c.Wait 1 minute, the drivers will install automatically.

NOTE:Step 1 above is only required the first time this procedure is performed. It is recommended that it be performed at the beginning of each day to confirm you have the latest software installed in your PC.

2.Turn the ignition ON, engine OFF / not Ready (if not still ON) and turn ON the hazard warning flasher lights (if not still ON).

3.Connect the J-51594 OCS reprogramming cable:

Connect to the vehicle’s DLC connector and the PC USB port.

Make sure the cable is securely connected at both ends.

4.Prepare the vehicle for OCS Reprogramming as follows:

Level the vehicle

No objects on the passenger seat.

No occupants in the vehicle – including the servicing technician.

PC is outside of the vehicle on a suitable support.

Do not set the PC on the vehicle.

Do not touch the vehicle during the OCS Reprogramming.

Minimize vibrations of the vehicle.

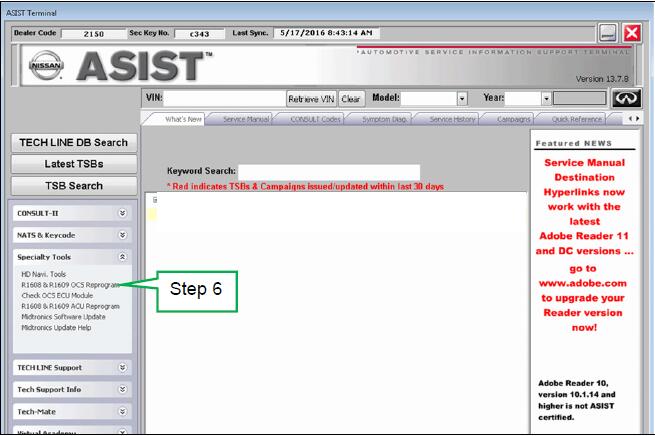
5.Open ASIST (if not already open).

6.Select “R1608 & R1609 OCS Reprogram” under Specialty Tools

Nissan-Sentra-OCS-Control-Unit-Reprogram-by-ASIST-1

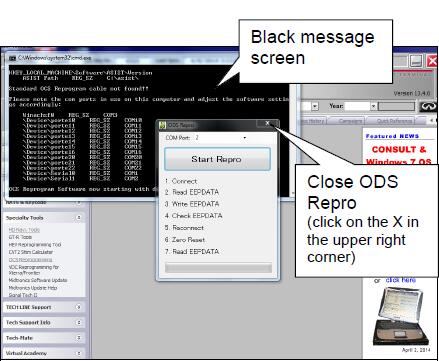
NOTE:If you get a black message screen as shown in Figure 26, this indicates that the reprogramming cable is not connected, or the cable driver did not install correctly.

a.Close ODS Repro.

b.Close ASIST.

c.Start over from step 1

Nissan-Sentra-OCS-Control-Unit-Reprogram-by-ASIST-2

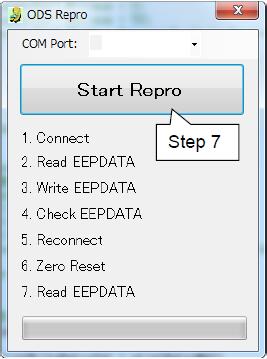
7.Select Start Repro.

NOTE:If the error message “an error occurred on connection” displays:

a.Disconnect the J-51594 OCS reprogramming cable, both ends.

b.Reconnect the cable; make sure it is securely connected at both ends.

Nissan-Sentra-OCS-Control-Unit-Reprogram-by-ASIST-3

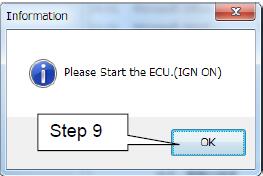
8.Turn the ignition ON (engine OFF).

9.Select OK.

After selecting OK, the OCS reprogramming will start.

Nissan-Sentra-OCS-Control-Unit-Reprogram-by-ASIST-4

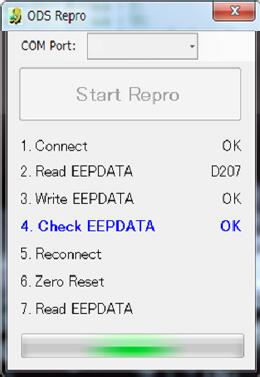
Items 1 through 4  will likely complete quickly.

Nissan-Sentra-OCS-Control-Unit-Reprogram-by-ASIST-5

10.Cycle the ignition OFF > ON.

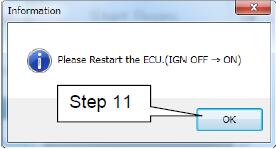
11.Select OK.

Nissan-Sentra-OCS-Control-Unit-Reprogram-by-ASIST-6

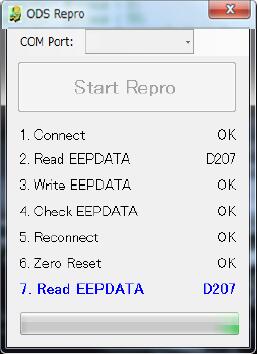
After selecting OK in Figure 30, the OCS reprogramming will likely complete items 5 through 7 quickly.

Nissan-Sentra-OCS-Control-Unit-Reprogram-by-ASIST-7

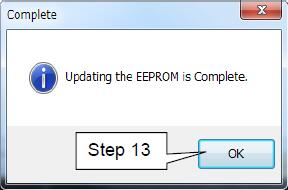
12.When this screen displays, OCS reprogramming is complete.

13.Select OK.

Nissan-Sentra-OCS-Control-Unit-Reprogram-by-ASIST-8

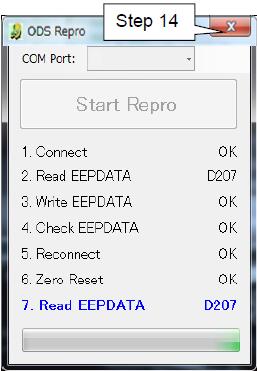
14.Close the program (click on the red X in the upper right corner).

Nissan-Sentra-OCS-Control-Unit-Reprogram-by-ASIST-9

15.Turn the ignition OFF.

16.Disconnect the J-51594 OCS reprogramming cable.

17.Turn the ignition ON and observe the air bag warning light and the front passenger air bag status light:

The air bag warning light should illuminate for 7 seconds and then go out.

The front passenger airbag status lightshould illuminate for 7 seconds and then either stay illuminated or go out, depending on the occupation of the front passenger seat.

NOTE: If the air bag warning light or the front passenger airbag status light does not operate as described above, there may be an issue not covered by this campaign. Refer to ASIST and the appropriate ESM for additional diagnostic and repair information.

OCS Reprogramming is Complete

NOTE: Zero Point Reset was included in the reprogramming – it is not necessary to perform as a separate step.


:: برچسب‌ها: launch X431,Launch Scanner,X431,launch X431 Scan Tool,launch x431 for sale,launch x431 scanner,launch x431 scanner reviews,Launch diagnostic tools, ,
:: بازدید از این مطلب : 374
|
امتیاز مطلب : 0
|
تعداد امتیازدهندگان : 0
|
مجموع امتیاز : 0
تاریخ انتشار : یک شنبه 31 فروردين 1399 | نظرات ()
نوشته شده توسط : lily

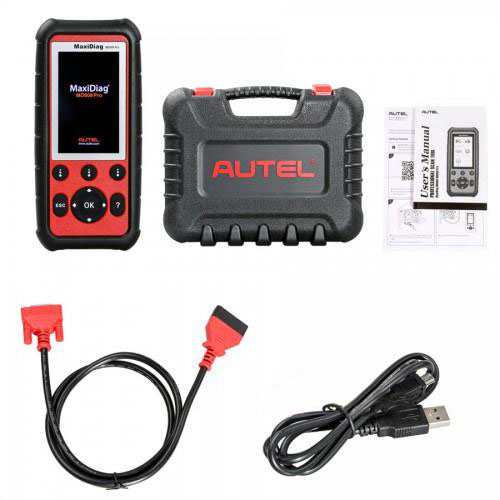
Starts with 3 actual user reports of Autel MD808 PRO for Sprinter, then Autel MD808 Pro compares AP200 scanner for Sprinter.

Review 1: Autel MD808 Pro for 2007 Sprinter worth the money

Got an Autel MD808 Pro for my 2007 Winnebago View with a 2006 Sprinter chassis. It didn’t communicate with the chassis out of the box.
Had to download the updates from Autel. Then, No Communication error when using USA–>Chrysler–>2006–>VA Sprinter, same as before updates. Works using European–>Sprinter–>Transporter or V-class–>Sprinter–> then both selection numbers 2 or 3 communicated successfully.

ZUH Heater Booster and ZHE Auxiliary Heater do not appear on the list of scanned functions.

Reset a number of old codes from before I purchased the rig. No codes after all resets.

Definitely worth the money to me.

Review 2: Autel MD808 Pro for 05 3500 Sprinter

I also have the Autel md808 pro. used it on an 05 3500. it seems to be able to access all of the modules and give a lot of freeze frame info and live data. also can record and graph live data with multiple things on one graph at the same time. for example you could watch intake air temp and MAF on one graph together. it resets my oil service light with no problem.

A great scanner that gives you a lot of info for the money. bonus is it can be used on all cars and gives you a lot more info than generic obd II only code readers.

Review 3: Autel MD808 Pro for 08 Sprinter

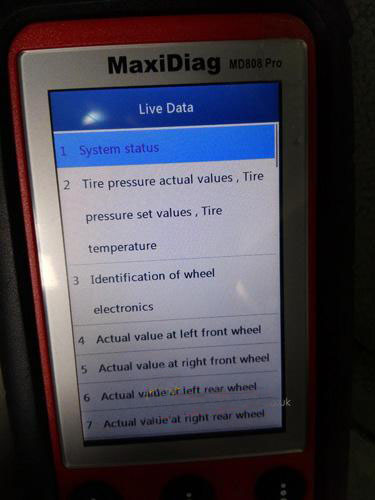
Got my MaxiDiag 808 Pro in, connected to my 08 Sprinter and it seemed to read every module with no problems. Here’s a picture reading the TPMS system.

It would read the generic OBD codes on my 1997 Toyota Tacoma but I couldn’t find any Tacoma listings in the Toyota section.

I connected it to my 2006 GMC Envoy and it picked up the ECM, transmission and I think ABS but I didn’t see the airbag module.

I think it’s a really decent diagnostic tool for the money but my initial impression is that it’s better for the European market than the Asian or USA market.

autel-md808-pro-for-sprinter

This is the MD802 all-module model.

It does cost more but I guarantee this will be the least you ever spend on a Sprinter. I believe that this is the pretty much the lowest cost turnkey all-module MB scanner available and is a very reasonable deal for the money. Also you can usually find them used in the $100-$150 range.

autel-md808-pro-for-sprinter-02


Autel MD808 Pro Vs. Autel AP200 for 2007 Sprinter

I can say that the Autel MD802 supports the 2007 NCV3 on both the Chrysler and MB/Sprinter menus, in fact as I remember the Chrysler menu has a module a two that the MB didn’t. But the MD808 and Autel AP200 may be different, as perhaps the T1N models.

The Autel AP200 theoretically mimics the Autel 808 in its model identifications.
For many of us, neither the Freightliner nor Dodge T1N VINs that it fetches from the ECM are recognized. We have to tell the AP200 it’s a “model 904” and it’s then happy to perform diagnoses.

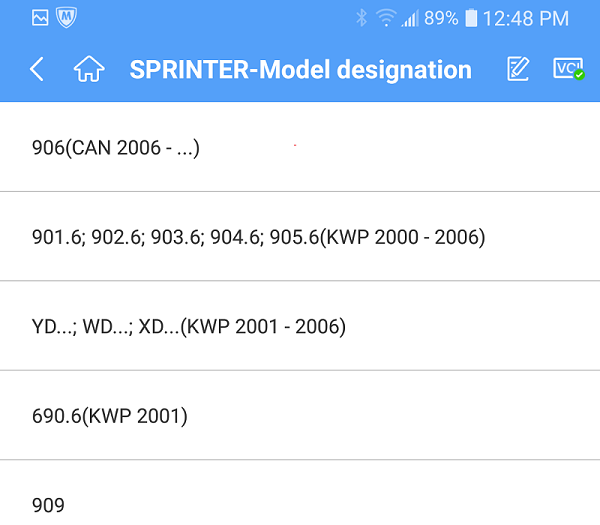
This shows the model selection screen that BENZ_Sprinter presents:

autel-md808-pro-for-sprinter-03

The “906” is the NCV3.

For the AP200 you need to have downloaded ‘BENZ-Sprinter’ as your ‘free’ option. Then you select the option for 903, 904, etc.

Enjoy!


:: برچسب‌ها: Autel MaxiDiag MD808,MaxiDiag MD808,MD808,Autel MD808,Autel MaxiDiag MD808 PRO,MD808 Pro,MaxiDiag MD808 PRO,Autel MD808 PRO,Autel MD808P,MaxiDiag MD808 Pro Scan Tool,Autel MD808 Pro Scan Tool, ,
:: بازدید از این مطلب : 557
|
امتیاز مطلب : 0
|
تعداد امتیازدهندگان : 0
|
مجموع امتیاز : 0
تاریخ انتشار : جمعه 22 فروردين 1399 | نظرات ()
نوشته شده توسط : lily

Opel Astra G 2001 key was successfully programmed by SVDI 2018, here we go for details.

Car model and year: Opel Astra G 2001

Symptom:  lost transponder, need to get it programmed, need to read and get security code for key programming to be success.

Opel key programmer to use:

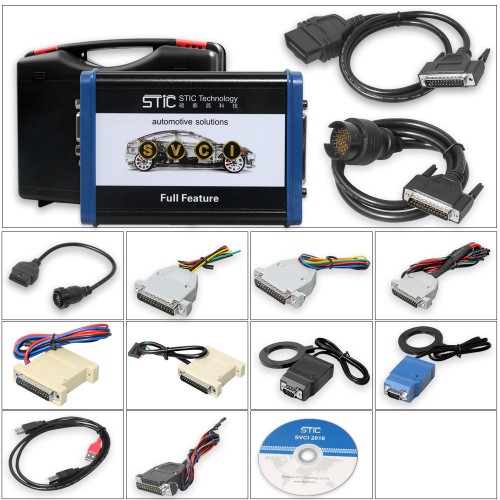
SVDI 2018 programmer

SVCI-2018-Opel-Astra-G

Suggestion 1:

Try to read Code from Engine Control Module
Otherwise you will need dump from immo ring for correct code.

The big ic is contain mmo/keys data
UPA read with no problems Just need to unsolder Mcu and put in adapter TMS370

Suggestion 2:

1) By changing the Vin Number your Pin Code will not change the pin code will remain the same UN-less you reset the ECU and enter any other pin code that’s when the pin code will change……

2) Your best bit is to use Carprog Tool to read pin code from engine ECU and use your FDVI to program the keys..

3) Once you have confirmed your pin code is right than go in to Immobilizer System delete all keys and program your new Transponder.

4) If you are 100% sure your pin code is right than check in live data and see what is the security time out showing it might have locked it due to entering wrong pin codes in that case live the ignition ON for the time showing and (without switching ignition OFF) go back and enter your pin code to program the key.

Suggestion 3:

all security codes and vin must be same in all units

Check security wait time is inactive in immobilizer.and yes it you reset it will accept any new pin but needs to match all other units.if you still can’t program key it means immo and ecu need resync to do this reset ecu and immo the go on program immo there should be a option to program click on new ecm and immo installed from the drop-down box.

Then key should program correctly if you have opcom use 1.59 firmware.

Finally, solved! Here is the test result:

I am happily breaking it to you guys that Opel Astra G has been successfully programmed.

I had this case as my manual all along the way. I used each and every view without hesitation because I trust you guys with your knowledge about cars.

1. I changed transponder chip. Precoded one
2. I went to immobilizer functions, entered security code and all the buttons that were not active became active.
3. I then reset ECU and Immobilizer from this immo section using the login code gotten from the car’s Immo ring MCU dump
4. went to Key Learning, entered the code and deleted all keys
5. clicked program key and remote…and it was done in less than 15 seconds
6. The car started just fine.

Enjoy!


:: برچسب‌ها: FVDI,FVDI tool,FVDI 2018, ,
:: بازدید از این مطلب : 368
|
امتیاز مطلب : 0
|
تعداد امتیازدهندگان : 0
|
مجموع امتیاز : 0
تاریخ انتشار : چهار شنبه 20 فروردين 1399 | نظرات ()
نوشته شده توسط : lily

When looking for a top-tier automotive diagnostic computer, consider the Autel IM608. This all-in-one professional car diagnostic tool comes with everything you or an entire automotive shop needs. It can handle everything from key programming or encryption to maintenance and systems testing.

But first, let’s see what the Autel MaxiIM IM608 offers in comparison to its competitors in the chart below.

Autel IM608 vs. Autel IM508 vs. Autel Maxisys Elite Comparison Chart
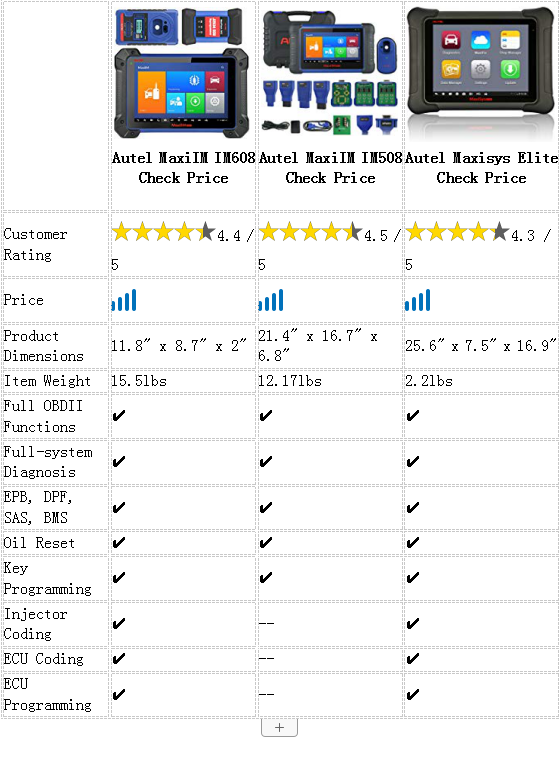
Autel-IM608-vs-Autel-IM508-vs-Autel-Maxisys-Elite-Comparison-Chart

Autel MaxiIM IM608 In-Depth Review

What’s Inside the Box?

In the package, you’ll get:

*   the main IM608 tablet
*   an XP400 key programmer
*   a MaxiFlash JVCI reprogammer
*   all the necessary cables and cords
*   an AC/DC adapter
*   a convenient carrying case

Functions and Services:
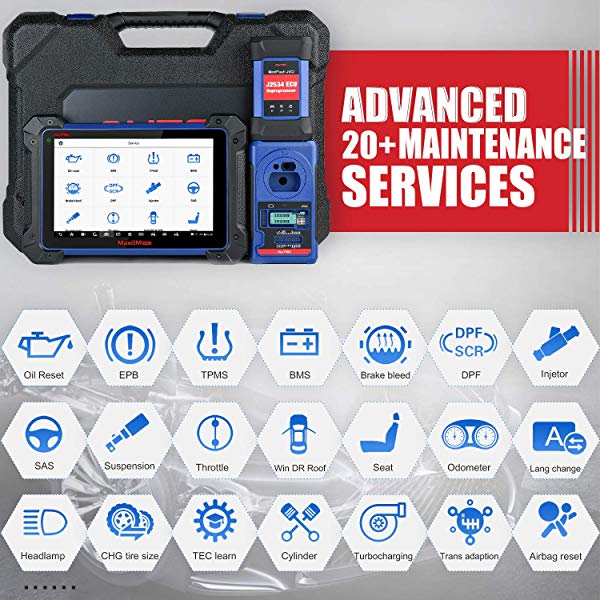
IM608-Functions-and-Services

The Autel IM608 allows for both a smart mode and expert mode depending on your experience level or needs. The smart mode takes some of the guidance away from your hands and handles automated key learning. Alternatively, the expert mode is used for advanced key learning. The smart mode is of particular value for automotive shops that need to train new employees in diagnostics.

Either mode allows you to take advantage of the Autel IM608’s various functions. In a nutshell, you can:

*    Read PIN or CS
*    Initiate Key Learning
*    Generate Some Keys
*    Activate Remote Learning
*    Reset the IMMO ECU
*    Backup or Restore your IMMO Data
*    Refresh your IMMO ECU

You can also handle key operations for 3rd generation Benz vehicles, BMWs, and many Volkswagen or Audis. The latter two allow for the alteration of certain transponders. The Autel IM608 currently supports vehicles from 1996 and later.

The tablet’s various functions are deep and well-suited for a variety of maintenance work. You can access the body electrical systems of plenty of cars. Or you can use the other functions to test or adjust various components or systems. Because connectivity is normally not an issue, testing or maintenance should go smoothly every time.

Programming
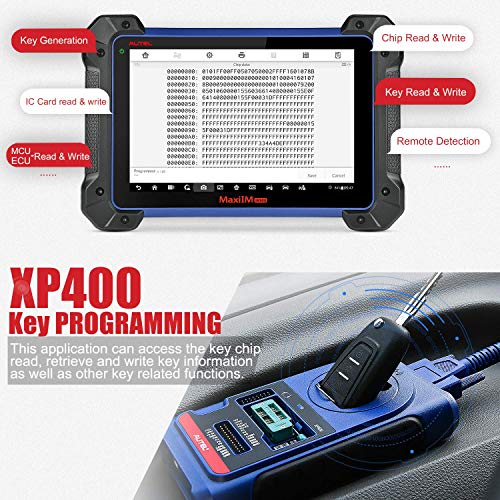
IM608-Programming

The MaxiFlash reprogrammer is quite robust. This can be used with either Bluetooth connectivity or a USB connection.

While the MaxiFlash can’t program new ECU keys, you can program duplicate ECU keys from this device. This is a great tablet for reading or writing keys if you need to perform maintenance or fix registration issues.

That’s not all the Autel IM608 can do. It can handle chip encryption for a variety of chip types, plus read or write on them for maintenance. IC cards can be read or written, as well. Remote frequencies are also easy to detect thanks to the myriad capabilities of the Autel IM608.

IM608-Full-System-Vehicle-Diagnostics

Diagnostics are this tool’s bread and butter. In fact, the Autel IM608 can perform OE-level, in-depth diagnostics for over 80 makes and models from the US, Europe, and Asia. The scanner can examine the full computer systems of many major vehicles. It’ll help you locate and solve an onboard computer problem much more quickly and reliably than a standard OBDII computer.

You can initiate such tasks as automatic scanning or read and erase codes with ease. The scanner is particularly sensitive and thorough. The interface is user-friendly and easy to navigate. Even models of cars that you’re not familiar with should be workable.

You can view freeze frame data or monitor data during live or simulated tests. It’s got everything you need to make sure your maintenance or repairs are going as smoothly as you imagine.

IM608-Connectivity

The primary tablet is equipped with a VCI, or Vehicle Communication Interface. There’s even an LED integrated into the connector port so you can hook it up in darkness. This is linked to the DLC or OBD II connection. Bluetooth functionality is saved for last, which ensures a stable connection to your subject car. The Autel IM608’s tablet can also connect to the internet via stable Wi-Fi.

You can connect the OBDII interface via Bluetooth to modern vehicles. So it’s easy to use the kit from anywhere in your shop. The Autel IM608’s devices have a maximum range of about 70 meters or 210 feet. Pairing the devices to certain vehicles is simple. This is a great choice for busy auto shops with a need to look at multiple cars in quick succession.

The Autel IM608’s ability to locate and diagnose issues on a chosen vehicle very quickly is superb. The Autel IM608 is equipped with an excellent data logging function. You’ll be able to track your progress and have records that you fixed any issue. This can be helpful during disputes.

Design

The Autel IM608 features a 10-inch touchscreen that is highly responsive to user input. The Android-based operating system allows for smooth functionality. It allows for advanced key programming through an aesthetically simple and pleasing interface. Navigating the various menus is never an issue and easy for even beginners to grasp.

The Autel IM608 comes with 64 GB of memory built-in. You can use this for storing project files or for loading your own music during work. A 15000mAh battery gives the tablet plenty of life for a day’s work. But you’ll still want to plug it in at the end of the day each time.

There’s also an 8.0 mega pixel camera integrated with the main tablet unit. This can help you take photos for documentation purposes or your own testing. Finally, the tablet comes with a multilingual suite. This can be of great use for multilingual automotive shops or for teams with more than one primary language.
Extras

The Autel IM608 comes with a year’s warranty that covers manufacturer defects and some cases of wear and tear. That’s great for peace of mind, especially given the high asking price. An accompanying money-back guarantee sweetens the deal even further.

Furthermore, the purchase includes a year’s worth of free software updates. That’ll ensure that your tablet doesn’t start to collapse from within or because it missed a critical patch.

Final Thoughts

Overall, the Autel IM608 is a phenomenal diagnostic tool kit that has everything one could need for modern automotive maintenance and alteration. Programming, scanning, and testing are all covered by its accompanying devices and software. It’s easy to use and connect and features free software updates. As a result, it’s an ideal choice for locksmiths and audio technicians alike.


:: برچسب‌ها: im608 ,
:: بازدید از این مطلب : 362
|
امتیاز مطلب : 3
|
تعداد امتیازدهندگان : 1
|
مجموع امتیاز : 1
تاریخ انتشار : دو شنبه 26 اسفند 1398 | نظرات ()
نوشته شده توسط : lily

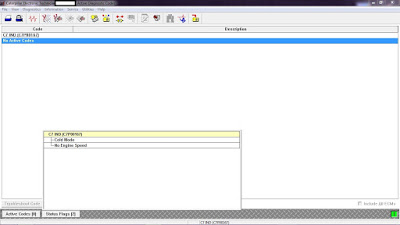
“Cold Mode” and “No Engine Speed” on Status Flags
Status Flags

Cold-Mode-and-No-Engine-Speed-on-Status-Flags-Caterpillar-ET-Software-1

Cold Mode
-The ECM limits engine power during cold mode operation and the ECM modifies injection timing during cold mode operation. Cold mode operation provides the following benefits:

*   Increased cold weather starting capability
*   Reduced warm-up time
*   Reduced white smoke

-The Electronic Control Module (ECM) limits engine power during cold mode operation. The ECM may modify the injection timing and the ECM may cut out certain engine cylinders. This will increase startability and this will reduce warm up time. Cold mode is activated whenever the engine coolant temperature falls below a predetermined value. Cold mode remains active until the engine has warmed or a time limit is exceeded.

Cold Mode Operation
-The ECM will set the cold start strategy when the coolant temperature is below 18 °C (64 °F).
-When the cold start strategy is activated, low idle rpm will be increased to 1000 rpm and engine power will be limited.
-Cold mode operation will be deactivated when any of the following conditions have been met:

*   Coolant temperature reaches 18 °C (64 °F).
*   The engine has been running for 14 minutes.

-Cold mode operation varies the fuel injection amount for white smoke cleanup. Cold mode operation also varies the timing for white smoke cleanup. The engine operating temperature is reached before the walk-around inspection is completed. The engine will idle at the programmed low idle rpm in order to be put in gear.

-After the cold mode is completed, the engine should be operated at low rpm until normal operating temperature is reached. The engine will reach normal operating temperature faster when the engine is operated at low rpm and low-power demand.

No Engine Speed
-It’s normal to see the “No Engine Speed” on Status Flags while power switched ON or Engine Cranking. It will not go away until the Engine Starts, even when you are seeing Engine Speed in Status Tool on CAT ET Software.


:: برچسب‌ها: CAT ET Software ,
:: بازدید از این مطلب : 454
|
امتیاز مطلب : 3
|
تعداد امتیازدهندگان : 1
|
مجموع امتیاز : 1
تاریخ انتشار : دو شنبه 26 اسفند 1398 | نظرات ()
نوشته شده توسط : lily

This instruction show you the main procedures on DTS Monaco coding for Mercedes Benz pedal characteristic curve-faster engine response.

Preparations:

Benz DTS Monaco Software Free Download

How to Install Mercedes Benz DTS Monaco Software

How to Use DTS Monaco Coding for Benz Brake Hold Function

Mercedes Benz Hill Assist Start Function Coding by DTS Monaco

How to Find Vediamo & DTS Monaco CBF and SMR-D Folder

MB SD Connect C4 C5 DTS monaco software user manual

DTS Monaco

Explanations:

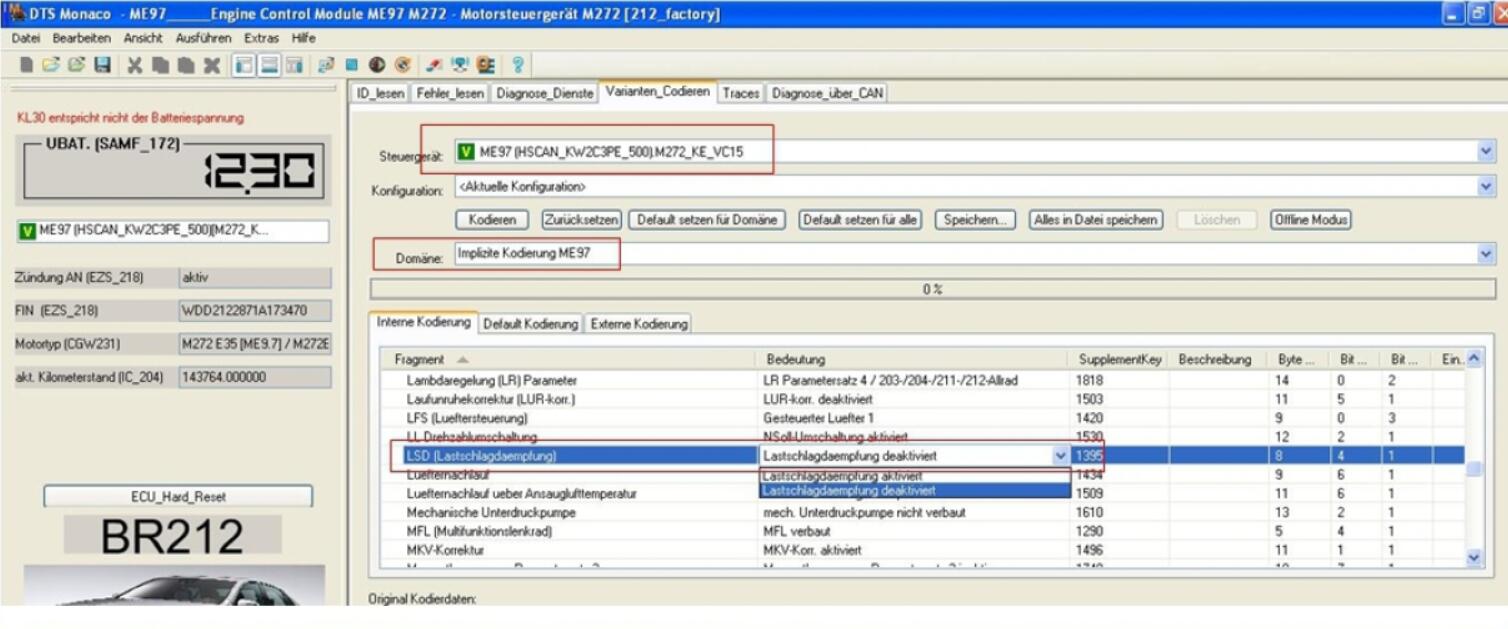
#1 (Lastschlagdaempfung) The is the most important one. This parameter seems to be the main culprit for the inconsistent feeling throttle response and sluggishness. and I believe it causes the wonky throttle body adaptations wFuch I find so awful.Disabling it has removed most,if not all delay in throttle input.It is referred to as “Ioad-reversal damping” in Vediamo (german), but it is the “Throttle Change Damping” parameter in Xentry. I changed this parameter about a month after the others,and it defimtely had the most significant impact on throttle response,and now the throttle is very consistent in performance. I believe this parameter is more directly related to the actual throttle body than the cjas pedal, unhke the next parameter.

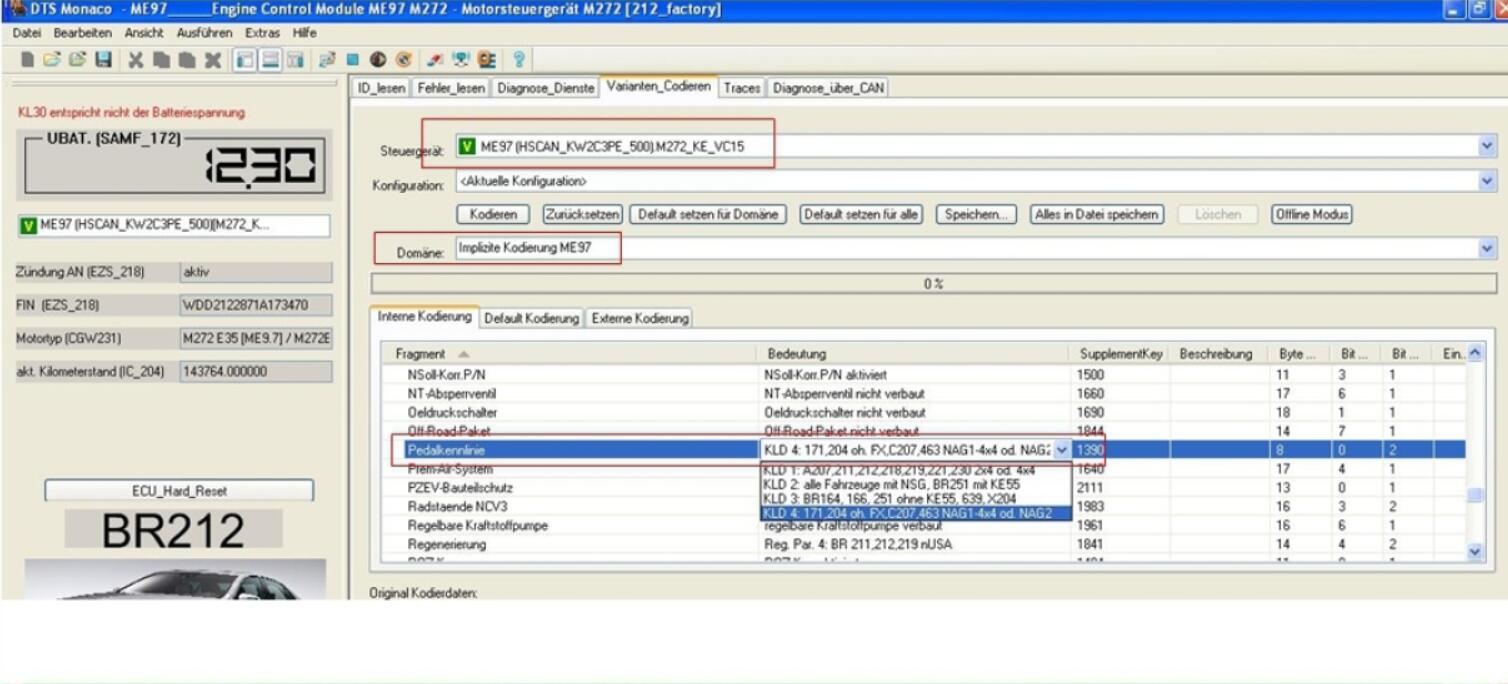
#2 (Pedalkennlime) This is the pedal curve parameter. My car had KLD4 as default. You can play with this, and possible leave it at KLD4. However, I changed it to KLD2. Rom what I understand, KLD2 is meant for cars with a manual transmission, and as such. rd expect ttie pedal curve to be the most “natural” feeling to the driver. In contrast, I believe KI_D4 is more responsive,but ‘jumpier” (more erratic in terms of throttle input). Combining KLD4 with disabling the throttle change damping parameter may be undesirable in terms of comfort/consistency.

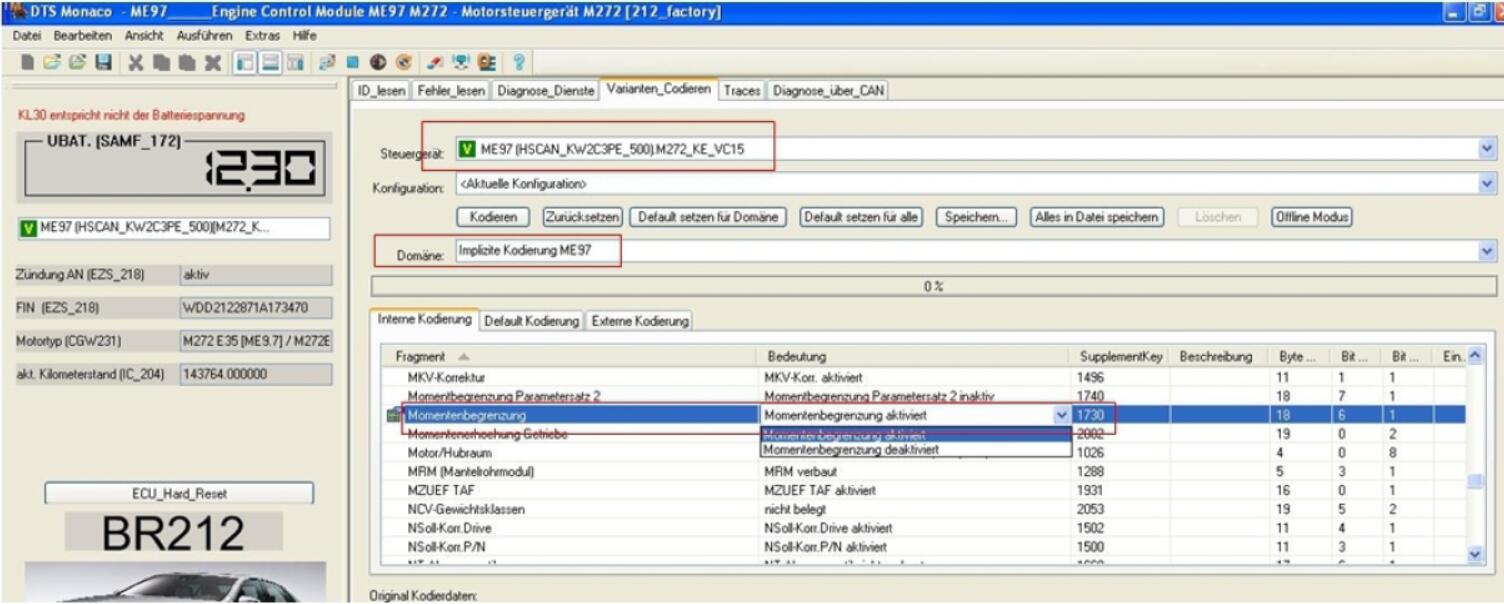
#3 (Momentenbegrenzung) this is the torque limit parameter. The main effect l’ve observed from disabling this is that the car doesn’t reduce throttle/torque as much while cornering anymore. and the car seems to accelerate slightly faster from a standstill than before. May not be necessary to fix throttle delay, but I find it favourable.

#4 (Mornentenerhoehung Getriebe) *This may already be set to the MSG option* This parameter is supplementary to #3. Like MrScott describes in his video, it allows the engine ECU to monitor torque output and send it to the transmission, but keeps it within safe/comfortable limits. I find this parameter to improve gear shifts very slightly; torque input and acceleration remains very steady throughout gear shifts. I believe it very slightly improve acceleration, even compared to only having the torque limiter disabled. Do not change this to the GS6 setting. Doing so resulted in some very uncomfortable shifting.I’m not sure if there’d be a long term effect on the gearbox here, so just don’t as a precaution. The option highlighted in black is the default setting – the ECU is not allowed to increase torque to ttie gearbox depending on measurement.

ECU: CR43, MED177 or other Engine ECU
Hard reset sollte hinterher durchgefuhrt werden
Hard reset should be performed afterwards
Both Zugriffberechtigung functions activated/needed
Engine needs to be turned off

Forum comments for this coding:
okay I successfully coded sm271de20 with latschlag,momentbegrezung and pedalideine. I can note. that car became a lot fastar. Also before coding I flashed ECU to the latest version. So if you got opportumty to do that – is a must.

I changed from KLDl (v221) to KLD3 (rz30) and deactivated the lastschlagdampfung.

Big difference, car is more sportive and feels quicker


:: برچسب‌ها: DTS Monaco ,
:: بازدید از این مطلب : 425
|
امتیاز مطلب : 2
|
تعداد امتیازدهندگان : 1
|
مجموع امتیاز : 1
تاریخ انتشار : چهار شنبه 14 اسفند 1398 | نظرات ()
نوشته شده توسط : lily

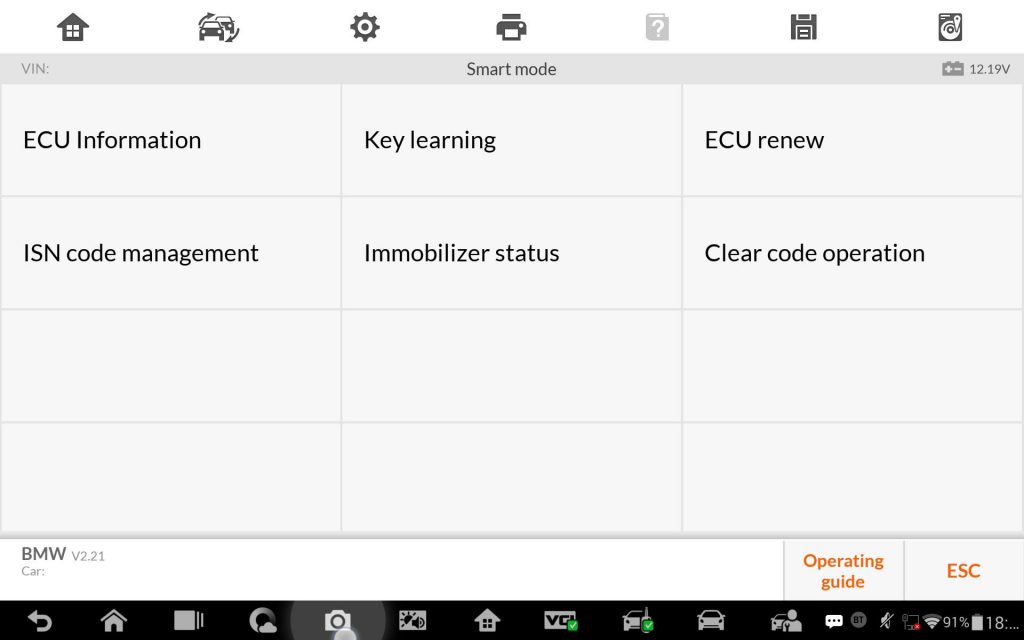
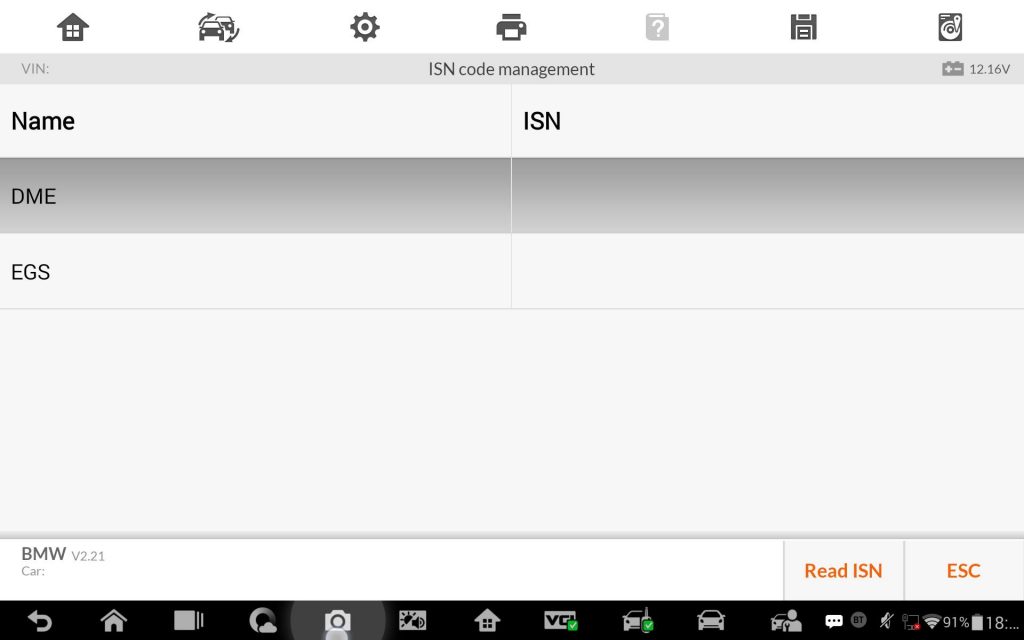
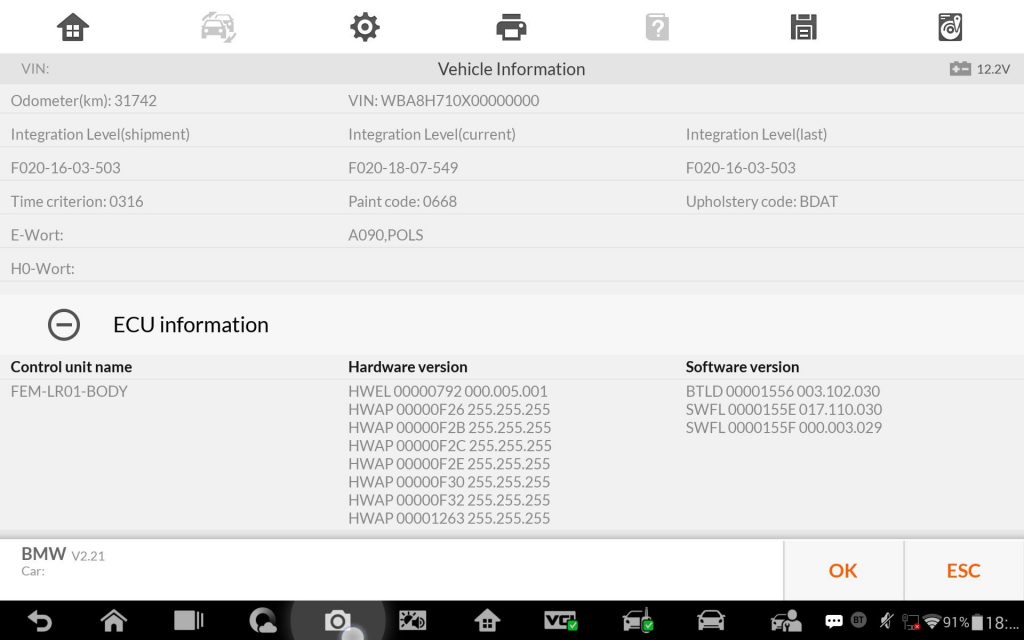
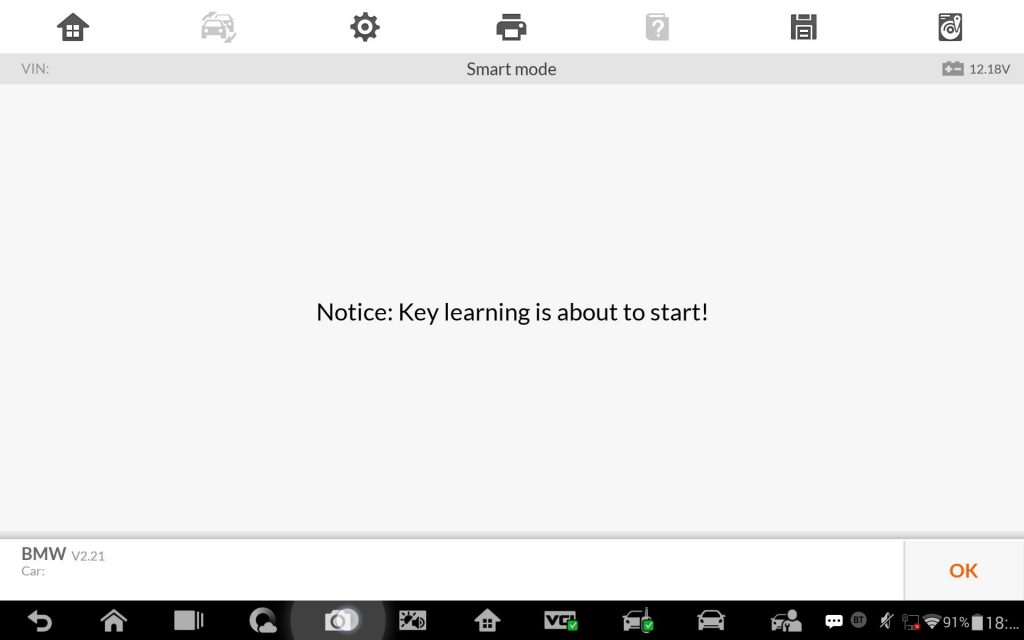
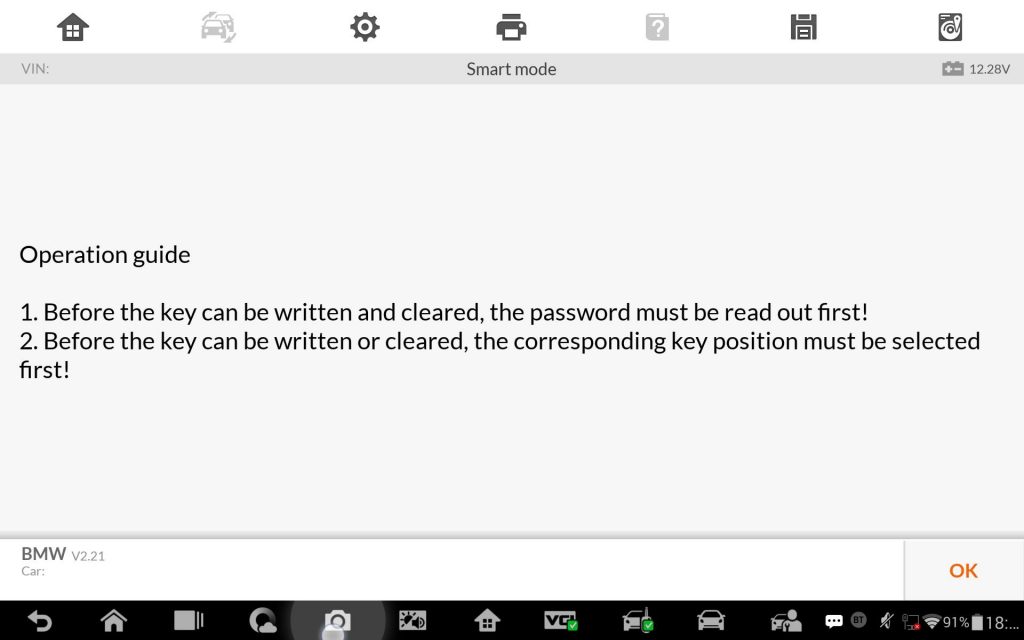
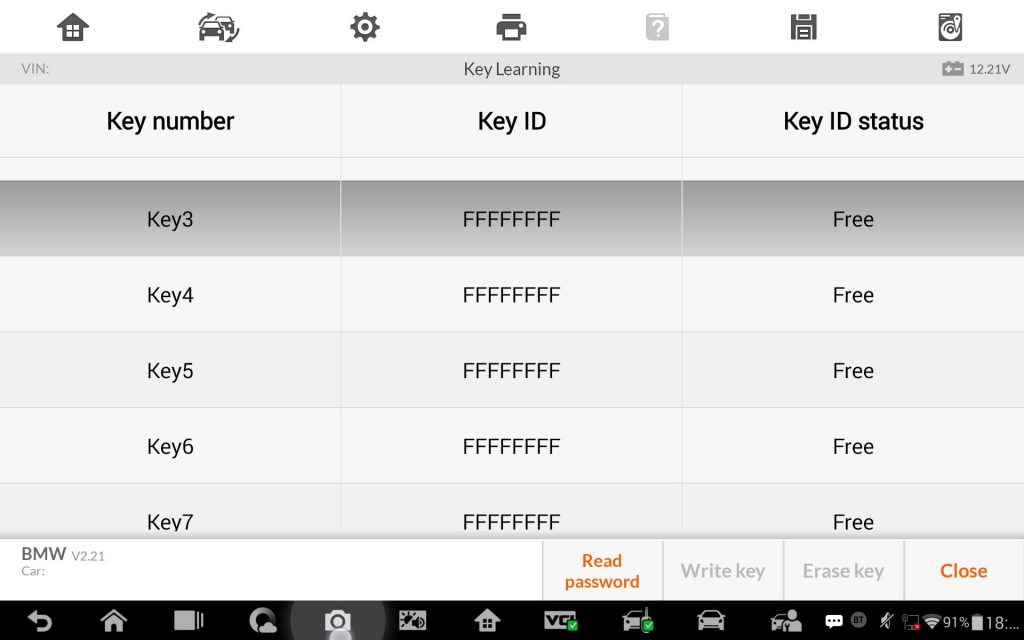
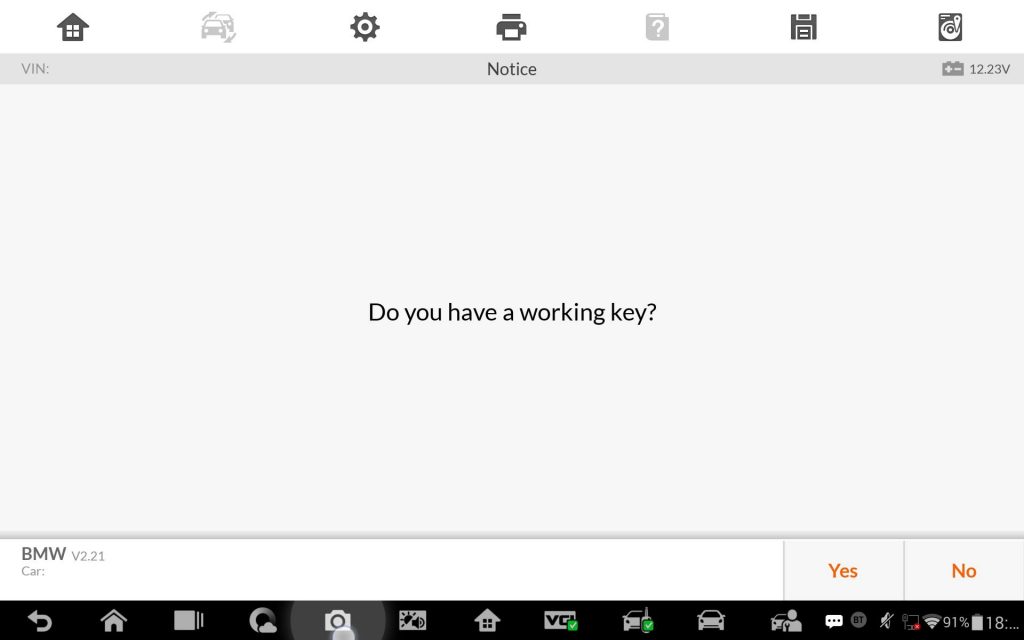
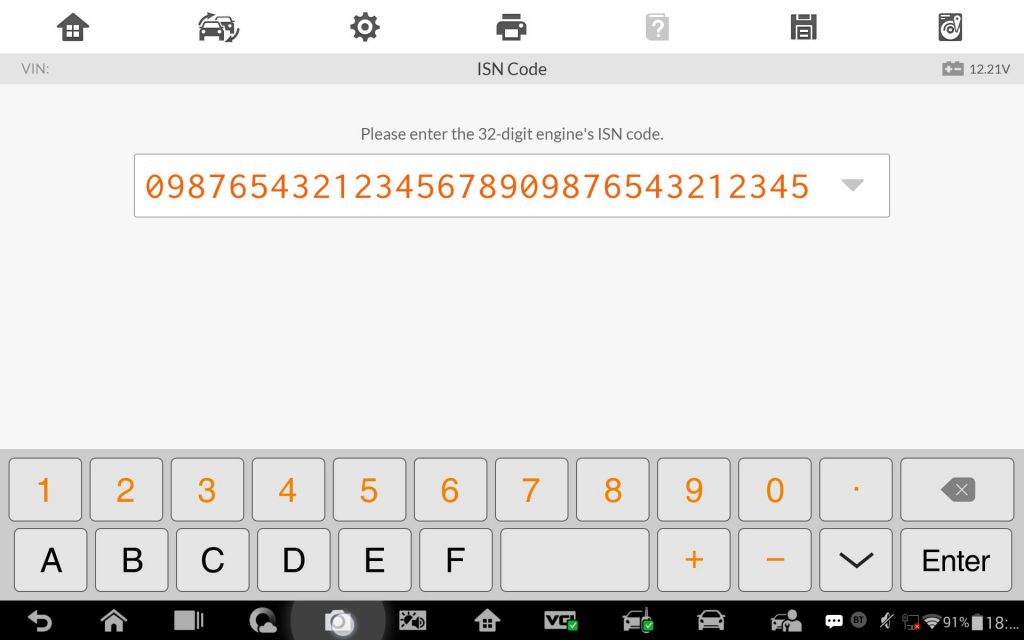
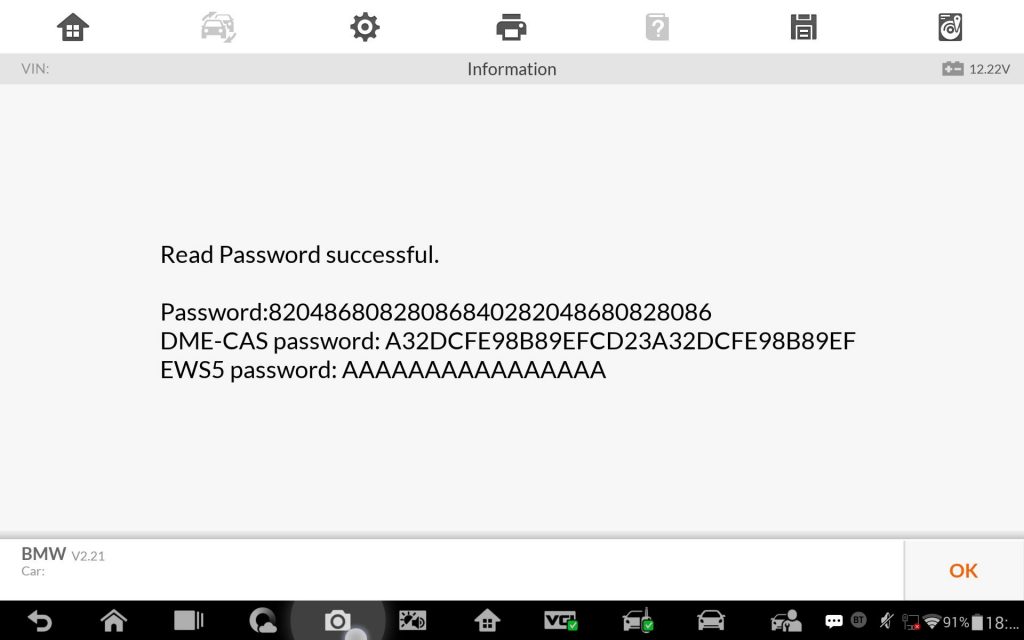
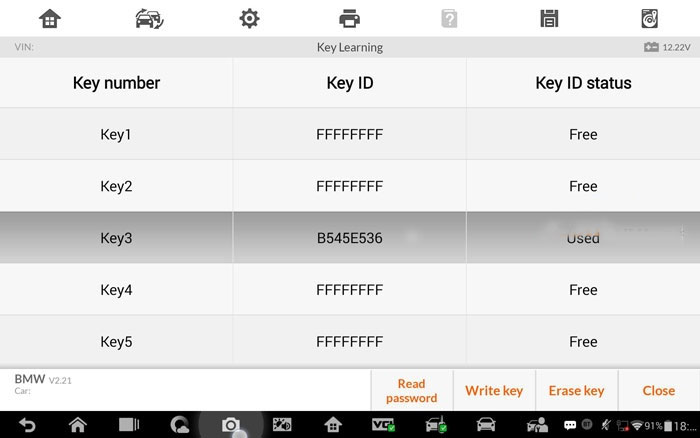
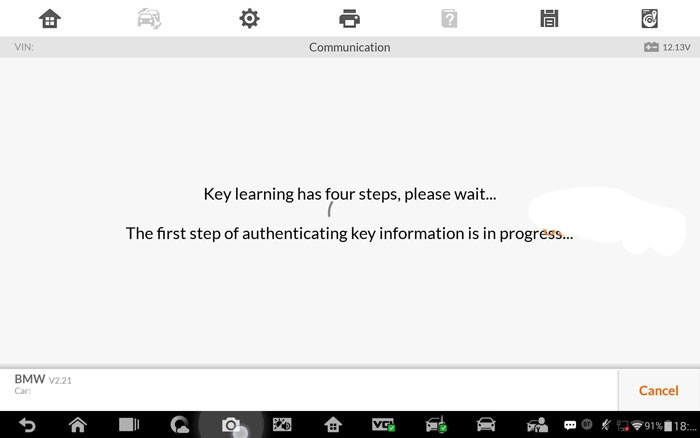
FEM/BDC BMW all keys lost programming

Used Autel MaxiIM IM608

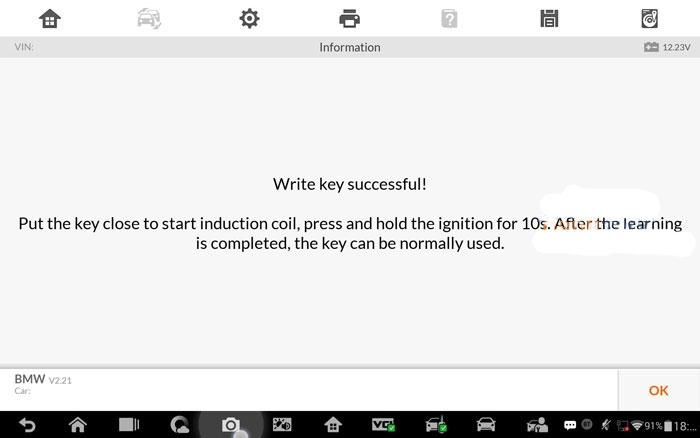
Results: Writing key success

Experience:

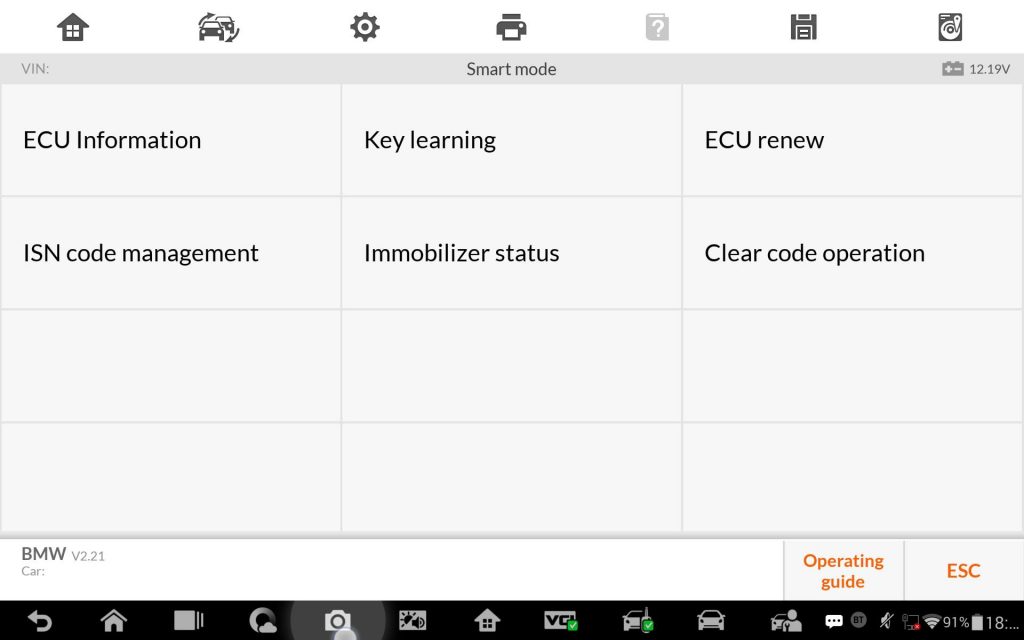
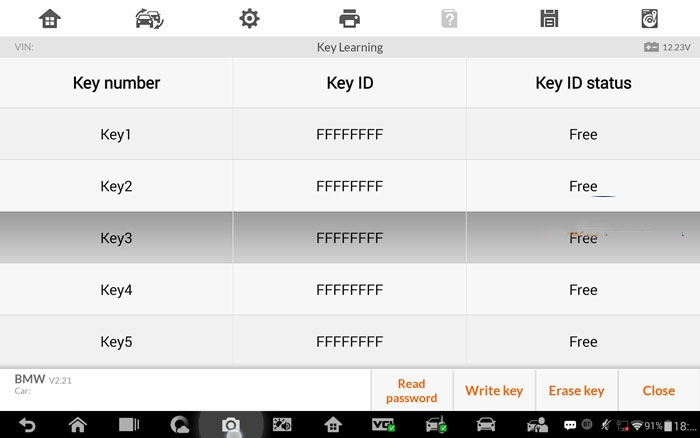
the ISN code is just an example because as I don’t have connected the DME, I cannot read the right one but it should be the first step before access the key programming. You can do it accessing the function “ISN Code Management” and then access to “Key Learning“.

Autel MaxiIM IM608 write key successfully for FEM/BDC:

Done.


:: برچسب‌ها: Autel MaxiIM IM608 ,
:: بازدید از این مطلب : 380
|
امتیاز مطلب : 4
|
تعداد امتیازدهندگان : 1
|
مجموع امتیاز : 1
تاریخ انتشار : چهار شنبه 14 اسفند 1398 | نظرات ()
نوشته شده توسط : lily


Bmw-E70-Coding-With-Vxiag-4

Tutorial: BMW E- series E70 Coding

Device: VXDIAG VCX Plus BMW or VXDIAG VCX SE BMW

Software: WinKFP, Ncs expert

Module example to be coded: JBBF

Procedure:

Step 1:

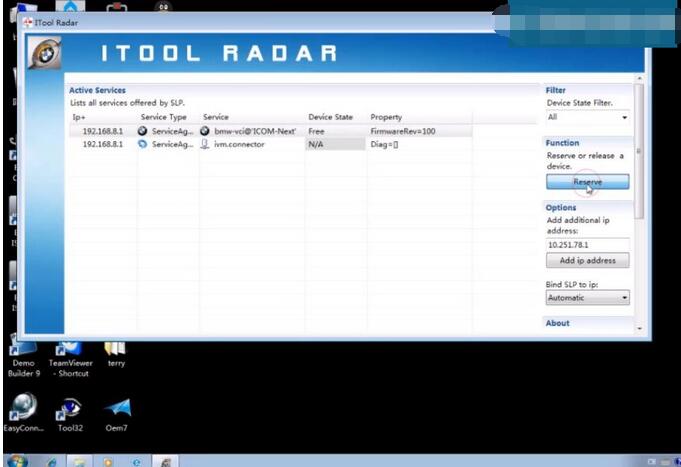
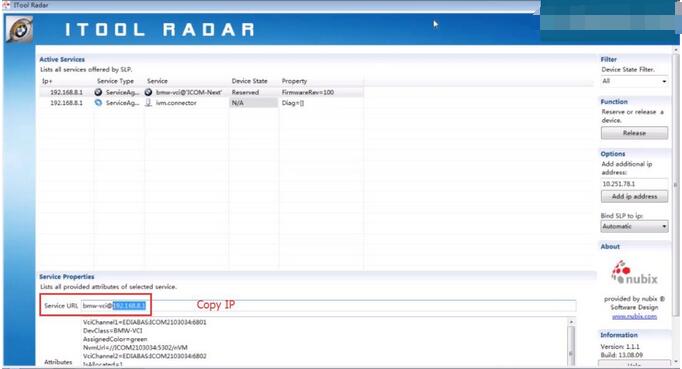
Open IToolRadar on the desktop

Bmw-E70-Coding-With-Vxiag-1
Find vxdiag vci hardware information and Reserve

Bmw-E70-Coding-With-Vxiag-2
Copy the IP address on the Service URL column
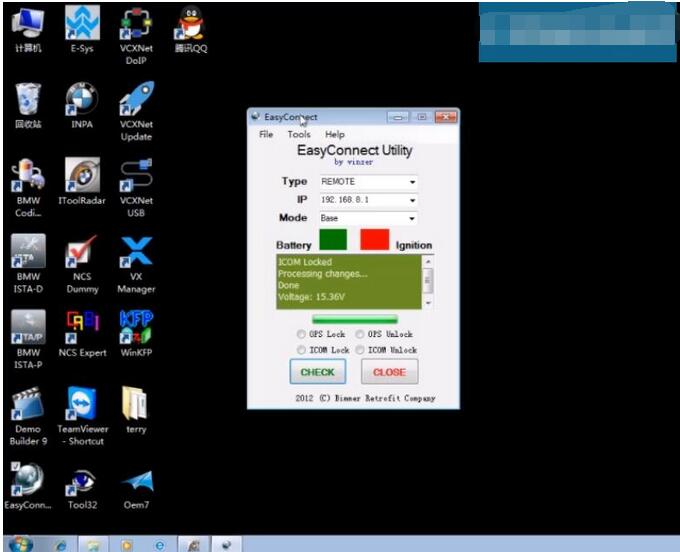
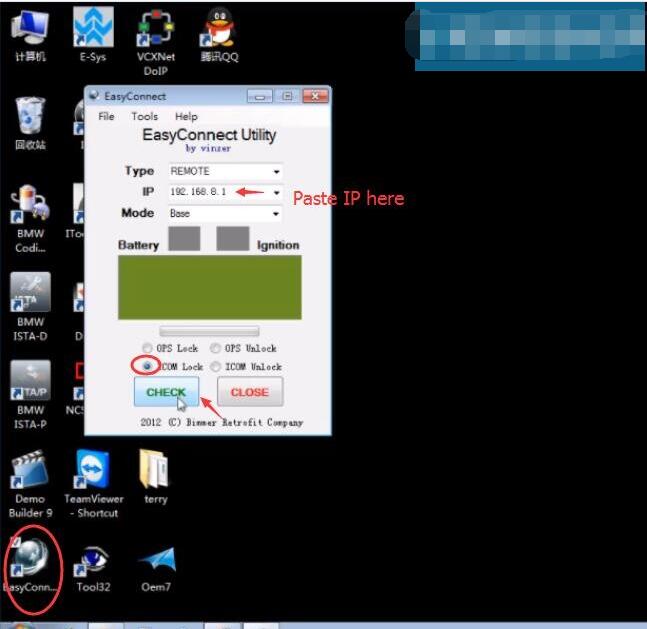
Oen EasyConnect on the desktop
Select Type: Remote
Paste the IP address to IP area

Bmw-E70-Coding-With-Vxiag-3
Select ICOM Lock and press CHECK button

Bmw-E70-Coding-With-Vxiag-4
ICOM locked. Check voltage status. Coding software is ready to use.

Step 2:

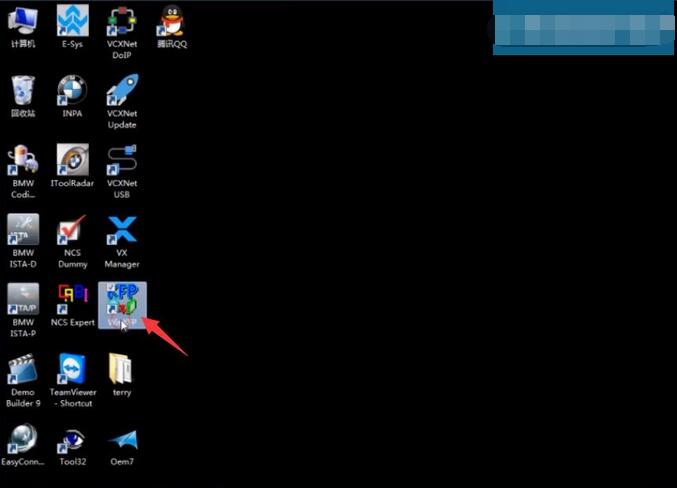
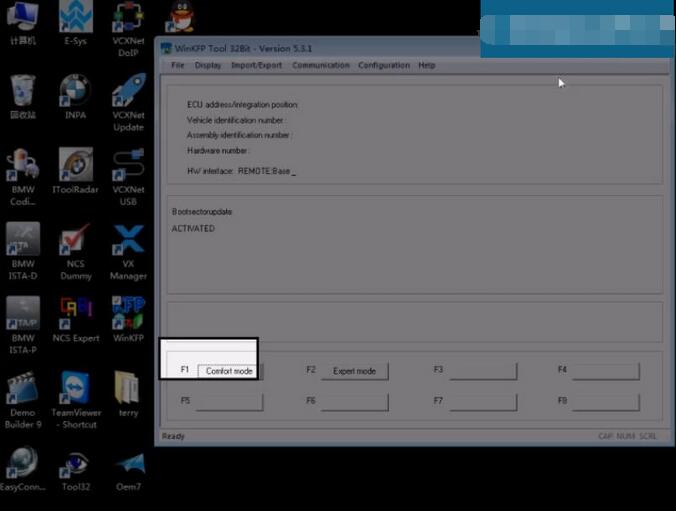
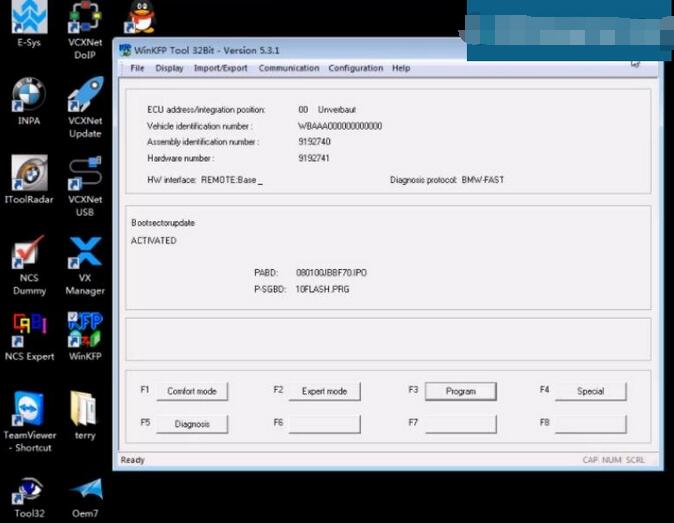
Open WinKFP software
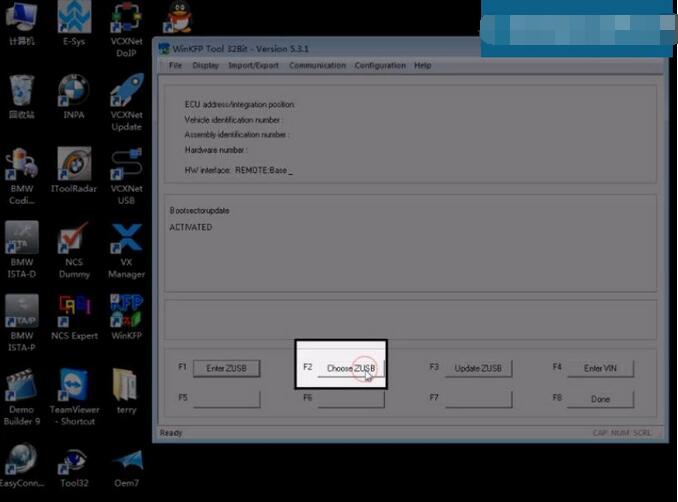
Go to
F1 Comfort Mode
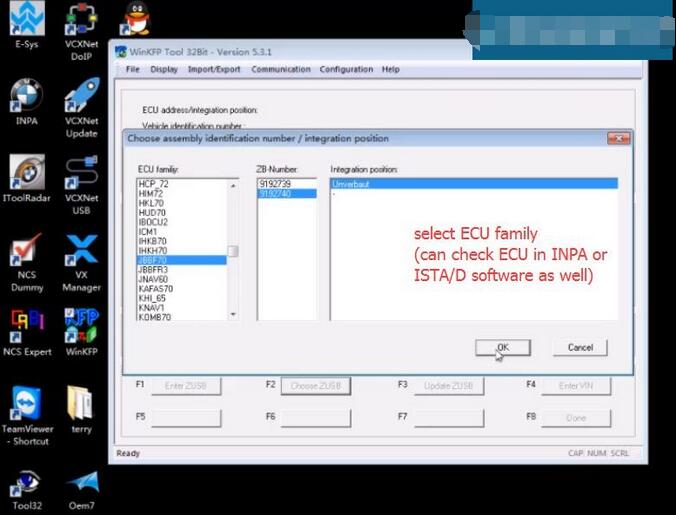
F2 Choose ZUSB
Choose corespsing ECU module, i.e JBBF70 and ZB number
(You can check ECU module name in INPA or ISTA/D)
Press OK
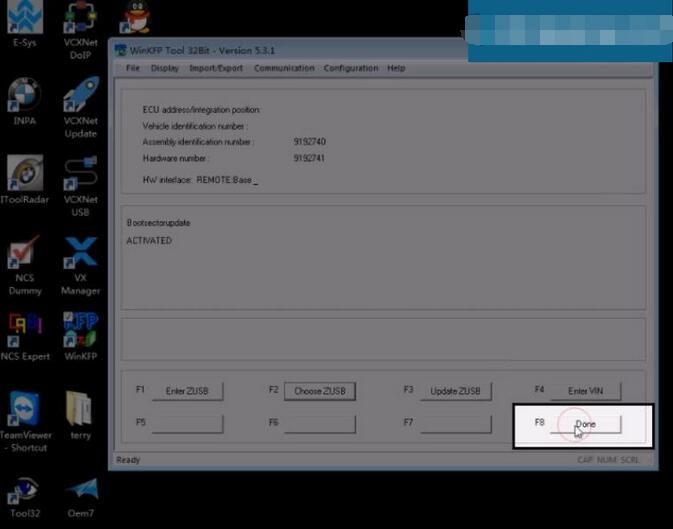
F8 Done
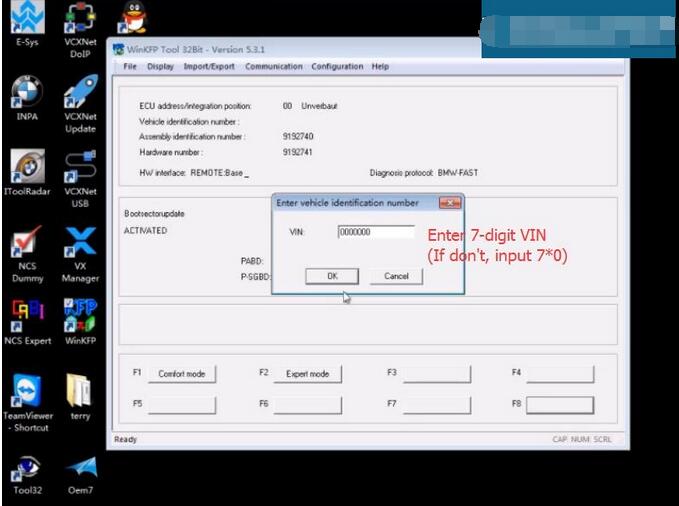
Manually enter 7-digit VIN (if don’t know VIN, enter 0000000 (7*0))
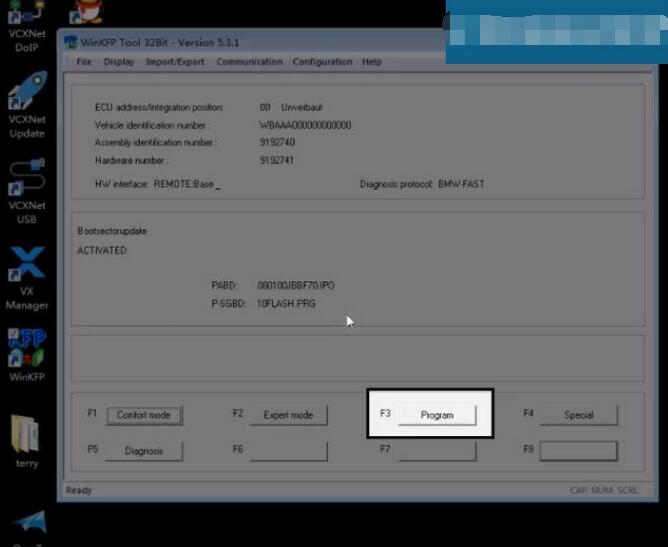
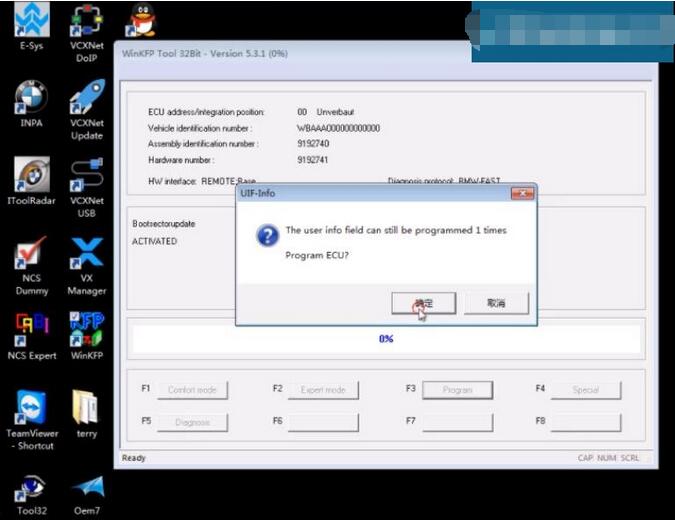
F3 Program
Confirm to program ECU
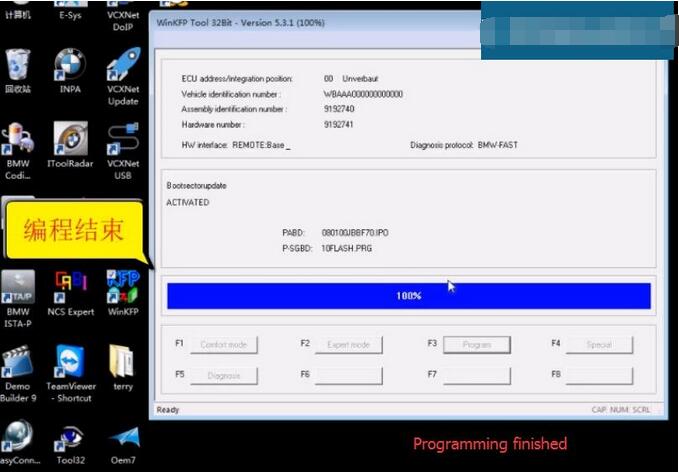
Programming completed

Bmw-E70-Coding-With-Vxiag-5

Bmw-E70-Coding-With-Vxiag-6

Bmw-E70-Coding-With-Vxiag-7

Bmw-E70-Coding-With-Vxiag-8

Bmw-E70-Coding-With-Vxiag-9

Bmw-E70-Coding-With-Vxiag-10

Bmw-E70-Coding-With-Vxiag-11

Bmw-E70-Coding-With-Vxiag-12

Bmw-E70-Coding-With-Vxiag-13

Bmw-E70-Coding-With-Vxiag-14

Step 3:

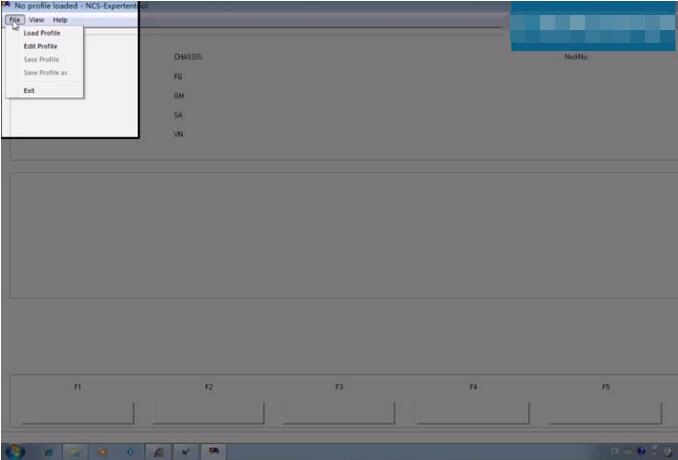
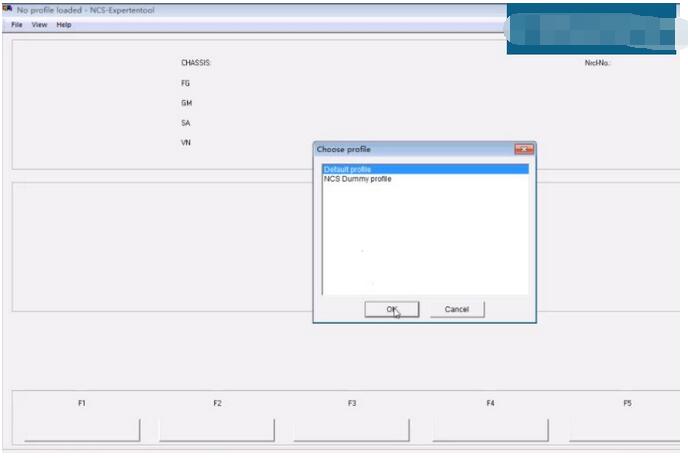
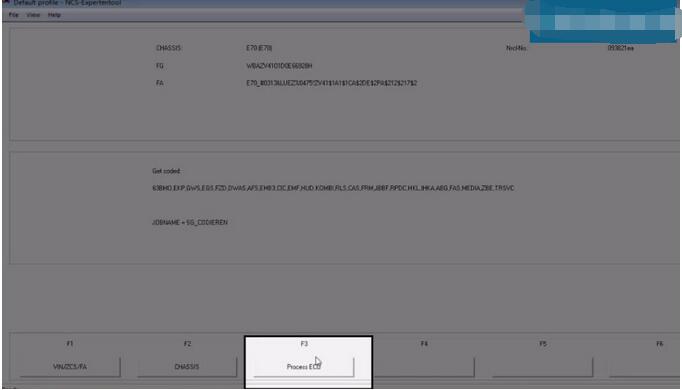
Now open NCS Expert software
Go to File tab->Upload Profile->Default Profile
F1 VIN/ZCS/FA
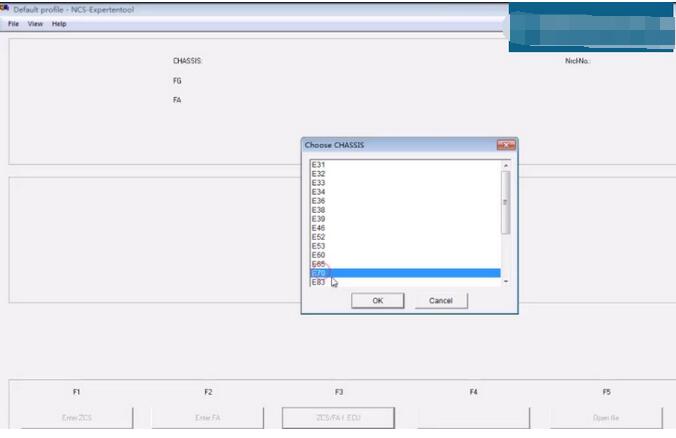
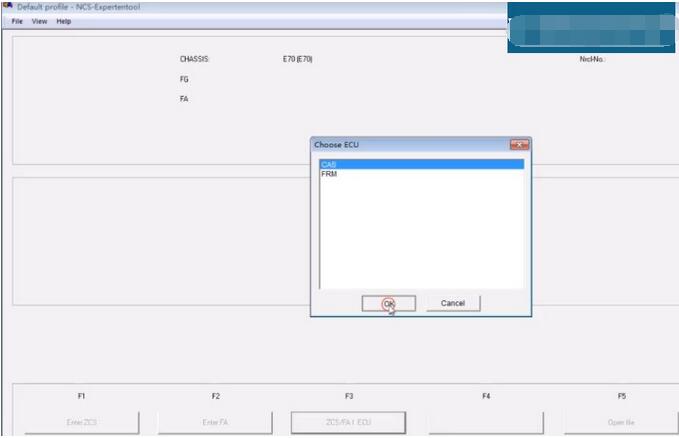
F3 ZCS/FA/ECU
Choose Chassis: E70
Choose ECU: CAS
F6 Back
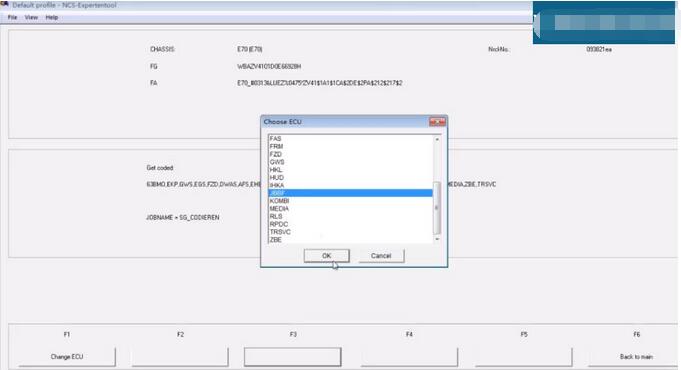
F3 Process ECU
Choose ECU Module: JBBF
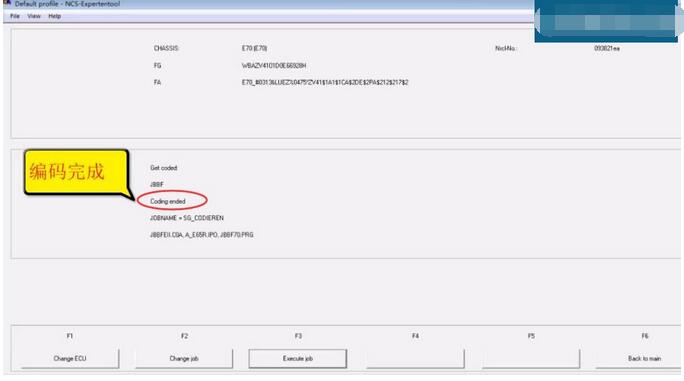
F3 Execute Job
Coding completed.

Bmw-E70-Coding-With-Vxiag-15

Bmw-E70-Coding-With-Vxiag-16

Bmw-E70-Coding-With-Vxiag-17

Bmw-E70-Coding-With-Vxiag-18

Bmw-E70-Coding-With-Vxiag-19

Bmw-E70-Coding-With-Vxiag-20

Bmw-E70-Coding-With-Vxiag-21

Check also:  How to set up VXDIAG BMW INPA software?


:: برچسب‌ها: VXDIAG VCX BMW ,
:: بازدید از این مطلب : 459
|
امتیاز مطلب : 5
|
تعداد امتیازدهندگان : 2
|
مجموع امتیاز : 2
تاریخ انتشار : پنج شنبه 1 اسفند 1398 | نظرات ()