نوشته شده توسط : lily

This article share the free download Volvo Premium Tech Tool diagnostic software,and you can click to download.
Free-download-Volvo-Premium-Tech-Tool-diagnostic-software-1

What is Volvo PTT?

Volvo Premium Tech Tool (PTT) is a Windows-based diagnostic application specially designed to test, calibrate and program engine parameters.

Volvo PTT Software Vehicle Model Coverage:

Volvo Trucks (Older electrical system, Vehicle electrical system ’98);
Volvo Trucks (VERSION2, VERSION3 – PARAMETER PROGRAMMING);
Volvo Trucks (VERSION4 – FH4/FM4 – PARAMETER PROGRAMMING);
Volvo Buses (Conventional, Multiplexed, Multiplexed v2, Multiplexed v3);
Volvo Construction Equipment;
Volvo Penta (VERSION2, VERSION3);
Volvo OEM Component Customer (VERSION2, VERSION3);
Mack Trucks (V-MAC I/II/III, ITC, IV, IV+ – PARAMETER PROGRAMMING);
Renault Trucks (VERSION2, VERSION3, VERSION4 – PARAMETER PROGRAMMING);
UD Trucks (VERSION2, VERSION3).PARAMETER PROGRAMMING);

Note:The free download software haven’t been verified on above vehicle models,the pay version does.

Volvo PTT Install environment requirement:

Computer/Processor:Intel® Core i5 or AMD FX 8 Core Series

Memory(RAM):6GB,more memory improves performance

Hard Disk:120GB SSD(Solid State Drive) of free hard disk space

Optical Drive:DVD x8 drive

Display:XGA(1024×768 pixels) or higher resolution monitor with 32 bit color settings

Input device:Keyboard and mouse or compatible pointing device

Internet connection:Network using 10 Mbps or higher speed network adapter and/or WLAN

Miscellaneous:USB interface required.A battery-pack that may provide 500mA via USB.

Minimum Hardware Requirements:

Computer/Processor:Inter® Core 2 Duo(1.6 GHz) or equivalent AMD Athlon 64 X2

Memory(RAM):3GB,more memory improves performance

Hard disk:20GB of free hard disk space

Optical Drive:Internal/external DVD x8 drive

Display:XGA(1024×768 pixels) or higher resolution monitor with 16 bit color settings

Input device:Keyboard and mouse or compatible pointing device

Internet connection:Network using 10 Mbps or higher speed network apapter and/or WLAN and/or 33.6 Kbps or higher speed modem(not supported for Win7/8 clients)

Miscellaneous:USB interface required.A battery-pack that may provide 500 mA via USB.

Volvo PTT Diagnostic Software Hardware:

Volvo Diagnostic Kit (88890300)
Renault Diagnostic Kit (88840133)
MACK Diagnostic Kit (RP1210)
UD Diagnostic Kit (RP1210)

PTT 2.7 Free Download:

https://mega.nz/#!cF8zyaKT!h10dbN01lwuonbXTt9EF5gsKP7rAwga2k3T41BmMOtM

TechToolLicenseEditor .rar:

https://mega.nz/#!IQ9FhISL!jvuPkrB1oW3YQAFdEqD1vE65lAv-sdZbC0PdKVl63ZA

Link 1: PTT 2.6.0.29.iso

https://mega.nz/#!mZZjnaSb!vFH83IALo2DjTp9ykgXekWv3DO9_KCn3r3-wQIiGA9Y

Password: NOT required

Activation: NOT activated

Security: Unknown

Files: encrypted files in installation dir:

apci.dll.enc

Volvo.ApciPlus.dll.enc

VolvoIt.ApciPlusData.dll.enc

VolvoIt.ApciPlusTea2Data.dll.enc

VolvoIt.Waf.Authorization.dll.enc

VolvoIt.Baf.BrokerServices.dll.enc

ProductService.dll.enc

VolvoIt.TechTool.DataAccess.dll.enc

VolvoIt.Waf.ServiceContract.dll.enc

VolvoIt.Baf.ServiceHostProcess.exe.enc

VolvoIt.Waf.EswManagement.dll.enc

Volvo Preminu Tech Tool 2.05.20

https://mega.nz/#!WZ4GRRYR!EBvasNyBwXJEo6CkMSWCmHTkxVV92FNk70vlxBllzzE

Totally 1.97GB

Volvo PTT 2.04.87 All-in-one include XX40645 in dev mode and M140521 in normal mode (full unlock)

https://mega.nz/#F!bcM03BAJ!4omQ_Yr9UQH7B5BhhNwGNA
Open all-in-one in administrator

Use all-in-one, you do not have to replace the files as the install guide. It will do it automatically

Open log Manager→ stop service→ clear log→ se all-in-one→ start service (You do this every time you change user!)

Download Volvo PTT 2.04.87 APCI+ 11/2016

https://mega.nz/#!khUDBIqT!dJT5ZVkkhE2mZaCEZLXoWKrgTR_nycfHvDuUB7y9qqw

Download Volvo PTT 2.04.87 Setup

https://mega.nz/#!c5Ez0byA!8F2SD-ja7DtI2l1mONpieuvqoNbA6L3Nx1fVrELxFMM

Pass: virginia2015

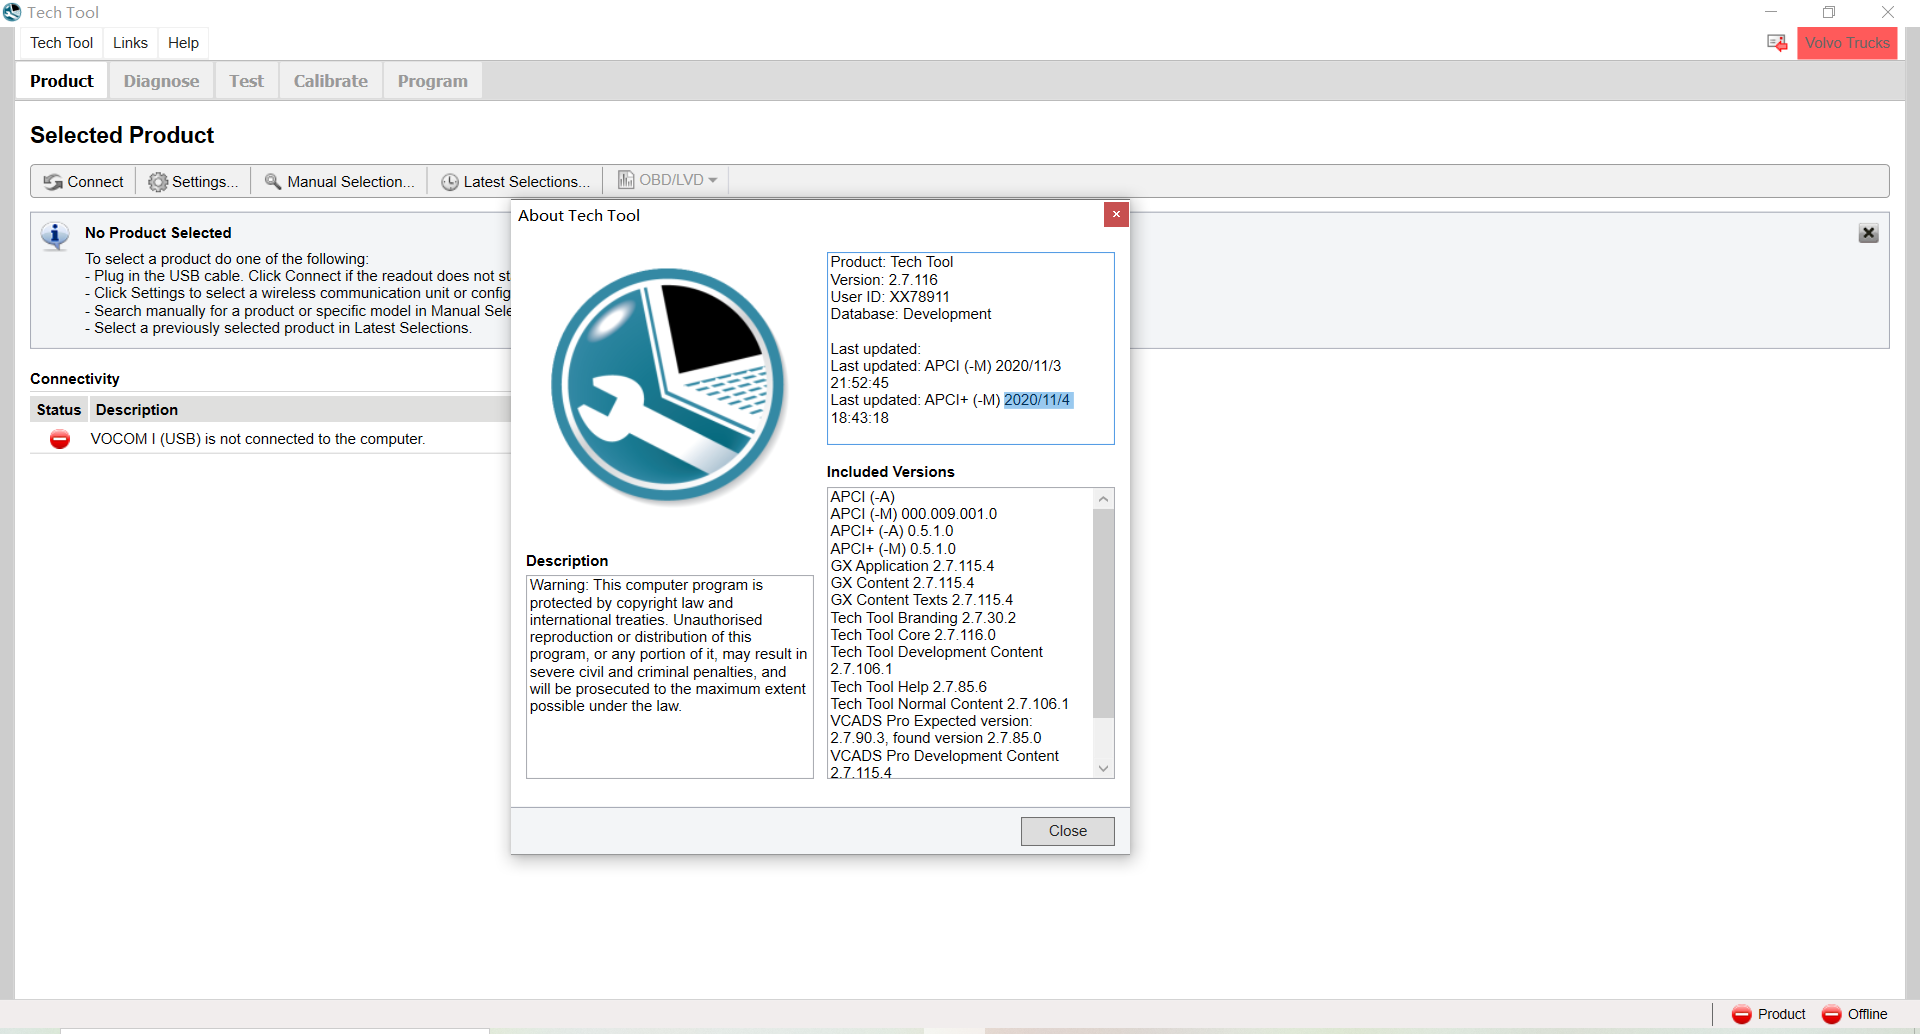
Volvo PTT 2.07 New Features:

Added!Odometer Reading
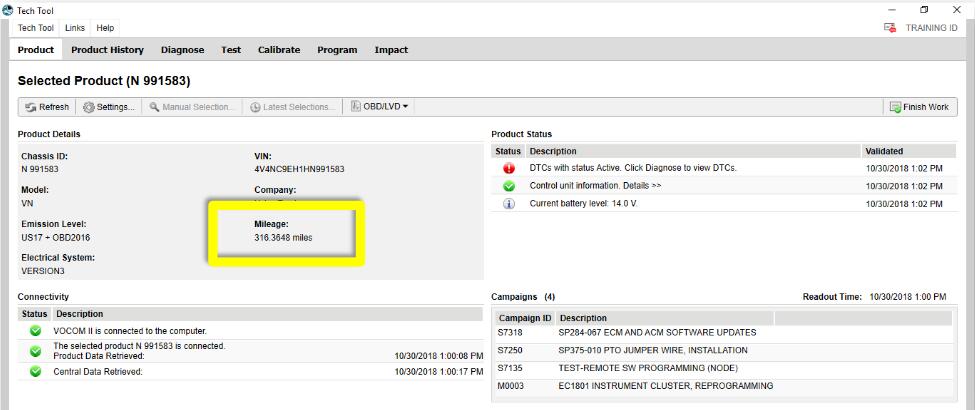
Free-download-Volvo-Premium-Tech-Tool-diagnostic-software-2

Added!Work Order Number–Battery Status

Free-download-Volvo-Premium-Tech-Tool-diagnostic-software-3

New Design!Settings –Radio button style
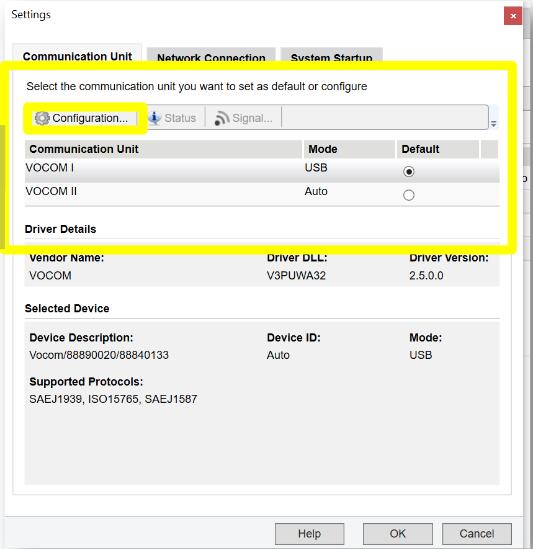
Free-download-Volvo-Premium-Tech-Tool-diagnostic-software-4

Configuration button launches the VOCOM II Configurator when VOCOM II is set as Default.

Free-download-Volvo-Premium-Tech-Tool-diagnostic-software-5

Added!Session Timeout

Heavy Duty Scanner Tech Tool will now automatically log out a user if there has been no user interaction for 1 hour. This timer is paused if there are any active operations running. A warning will appear before automatic logout.

Help Menu –Central Systems Status
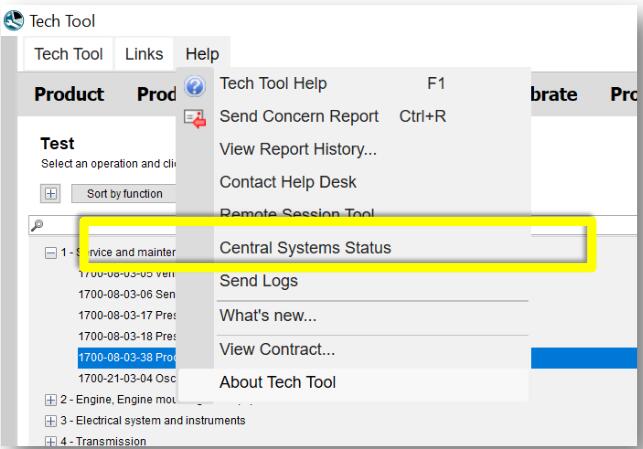
Free-download-Volvo-Premium-Tech-Tool-diagnostic-software-6

Note: This is not new with Tech Tool 2.7.

Links Menu –PremiumTechTool.com
Free-download-Volvo-Premium-Tech-Tool-diagnostic-software-7


:: بازدید از این مطلب : 325
|
امتیاز مطلب : 5
|
تعداد امتیازدهندگان : 1
|
مجموع امتیاز : 1
تاریخ انتشار : چهار شنبه 22 بهمن 1399 | نظرات ()
نوشته شده توسط : lily

The GM MDI 2 multiple interface will transfer data faster than a MDI 1/ VCX Nano GM (since its a MDI1 clone).  The GM MDI2 clone blue box are out, running about $218, it is really needed for the 2020 and future cars that will be running the future global B platform.

Hence installing the needed software to get everything to run can be almost brain damage if you are not tech savvy, and because of this, There is the MDI 2 clone with cracked free type software already loaded on a Sata Hard drive for $268.

MDI2 with 2020.09 HDD v8.3.103.39 gds2 tech2win
It will work on win10, but the cracked software for MDI2 clone requires win7.

Tips:
1. If you purchased V2020.09 GM MDI GDS2 Tech2win software Sata HDD, please directly plug it into your computer with Win7 OS, then confirm if the driver can be used, that’s ok, it is not necessary to install by yourself.

If it prompt update the JAVA, please don’t update it otherwise the GDS won’t be working.

If it prompt update the firmware, just do it.

2. After updating GM MDI manager, please update the firmware simultaneously.

Check: Update GM MDI/MDI2 Firmware

3. The WIFI GM MDI 2 Multiple Diagnostic Interface from OBD2TOOL is compatible with the original Bosch GDS2 software, as long as the user has License by yourself.

GM-MDI-2-Clone-is-Compatible-with-Original-GDS2-Software-1
GM-MDI-2-Clone-is-Compatible-with-Original-GDS2-Software-2

Customer feedback on MDI2 clone and genuine GDS:

“I just received my MDI II clone a couple of days ago and did a firmware update to make sure the latest v2020.12 Bosch software would recognize it and update it and it did with no problem. Programmed an ECM on bench. Connecting it through ACDelco Tis2Web and then use SPS to program the actual controller.

It is verified working with bosch GDS just as the seller advertised.”

If someone is looking to buy a Global B platform car, and needs a tool that will work on both it and the older cars like the C6 corvette, GM MDI2 clone really is the ticket. As for right now for a C6 and “A” platform cars, the vxdiag vcx nano gm has you covered for $118 instead.


:: برچسب‌ها: GM MDI 2 ,
:: بازدید از این مطلب : 321
|
امتیاز مطلب : 1
|
تعداد امتیازدهندگان : 1
|
مجموع امتیاز : 1
تاریخ انتشار : چهار شنبه 22 بهمن 1399 | نظرات ()
نوشته شده توسط : lily

Here we will show you how to active hidden function by X431 PRO for Toyota Reiz 2015.

Active-Hidden-Function-via-X431-PRO-for-Toyota-Reiz-2015-1 (2)

Function has been already tested on Toyota below:

1. Automatic padlock
2. Switch off the ignition about 30S/60S/120S Automatic padlock setting;
3 Press Remote control one time or twice to unlock setting.;
4. Luggage cover Settings;
5. The remote control shuts down all electric Windows;
6. The remote control opens all electric Windows;
7. ……

If you want to know more about X431 PRO, please click here: How to use launch X431.

Procedure:

Select“Toyota V48.42”above or VIN identification;
Select 16Pin diagnostic socket(European and other area)

Active-Hidden-Function-via-X431-PRO-for-Toyota-Reiz-2015-2 (2)

Select the automatic search

Active-Hidden-Function-via-X431-PRO-for-Toyota-Reiz-2015-3 (2)

Select after 2013.09

Active-Hidden-Function-via-X431-PRO-for-Toyota-Reiz-2015-4 (2)

Actual measurement car model is no smart key,select no smart key

Active-Hidden-Function-via-X431-PRO-for-Toyota-Reiz-2015-5 (2)

Read vehicle information

Active-Hidden-Function-via-X431-PRO-for-Toyota-Reiz-2015-6 (2)

Select system selection

Active-Hidden-Function-via-X431-PRO-for-Toyota-Reiz-2015-7 (2)

Select car body system

Active-Hidden-Function-via-X431-PRO-for-Toyota-Reiz-2015-8 (2)

Select BCM(Car Body Control System, main car body

Active-Hidden-Function-via-X431-PRO-for-Toyota-Reiz-2015-9 (2)

Select special function

Active-Hidden-Function-via-X431-PRO-for-Toyota-Reiz-2015-10 (2)

If select“Automatic Scan Special function”, This feature will automatically scan all options for personalized Settings for the diagnostic vehicle
If you select “all special functions”, this feature will display a warning message,The cue shows all the customization options for Toyota cars
Item, not all options are suitable for diagnostic models.

Active-Hidden-Function-via-X431-PRO-for-Toyota-Reiz-2015-11 (2)

Select customization

Active-Hidden-Function-via-X431-PRO-for-Toyota-Reiz-2015-12 (2)

Hidden functions display below:

Active-Hidden-Function-via-X431-PRO-for-Toyota-Reiz-2015-13 (2)
Active-Hidden-Function-via-X431-PRO-for-Toyota-Reiz-2015-14 (2)

Active-Hidden-Function-via-X431-PRO-for-Toyota-Reiz-2015-15 (2)

Active-Hidden-Function-via-X431-PRO-for-Toyota-Reiz-2015-16 (2)

If you want to know more cases about Toyota, please refer to Toyota repair.


:: برچسب‌ها: X431 PRO ,
:: بازدید از این مطلب : 286
|
امتیاز مطلب : 3
|
تعداد امتیازدهندگان : 1
|
مجموع امتیاز : 1
تاریخ انتشار : سه شنبه 7 بهمن 1399 | نظرات ()
نوشته شده توسط : lily

Here we will show you how to active hidden function by X431 PRO for Toyota Reiz 2015.

Active-Hidden-Function-via-X431-PRO-for-Toyota-Reiz-2015-1 (2)

Function has been already tested on Toyota below:

1. Automatic padlock
2. Switch off the ignition about 30S/60S/120S Automatic padlock setting;
3 Press Remote control one time or twice to unlock setting.;
4. Luggage cover Settings;
5. The remote control shuts down all electric Windows;
6. The remote control opens all electric Windows;
7. ……

If you want to know more about X431 PRO, please click here: How to use launch X431.

Procedure:

Select“Toyota V48.42”above or VIN identification;
Select 16Pin diagnostic socket(European and other area)

Active-Hidden-Function-via-X431-PRO-for-Toyota-Reiz-2015-2 (2)

Select the automatic search

Active-Hidden-Function-via-X431-PRO-for-Toyota-Reiz-2015-3 (2)

Select after 2013.09

Active-Hidden-Function-via-X431-PRO-for-Toyota-Reiz-2015-4 (2)

Actual measurement car model is no smart key,select no smart key

Active-Hidden-Function-via-X431-PRO-for-Toyota-Reiz-2015-5 (2)

Read vehicle information

Active-Hidden-Function-via-X431-PRO-for-Toyota-Reiz-2015-6 (2)

Select system selection

Active-Hidden-Function-via-X431-PRO-for-Toyota-Reiz-2015-7 (2)

Select car body system

Active-Hidden-Function-via-X431-PRO-for-Toyota-Reiz-2015-8 (2)

Select BCM(Car Body Control System, main car body

Active-Hidden-Function-via-X431-PRO-for-Toyota-Reiz-2015-9 (2)

Select special function

Active-Hidden-Function-via-X431-PRO-for-Toyota-Reiz-2015-10 (2)

If select“Automatic Scan Special function”, This feature will automatically scan all options for personalized Settings for the diagnostic vehicle
If you select “all special functions”, this feature will display a warning message,The cue shows all the customization options for Toyota cars
Item, not all options are suitable for diagnostic models.

Active-Hidden-Function-via-X431-PRO-for-Toyota-Reiz-2015-11 (2)

Select customization

Active-Hidden-Function-via-X431-PRO-for-Toyota-Reiz-2015-12 (2)

Hidden functions display below:

Active-Hidden-Function-via-X431-PRO-for-Toyota-Reiz-2015-13 (2)
Active-Hidden-Function-via-X431-PRO-for-Toyota-Reiz-2015-14 (2)

Active-Hidden-Function-via-X431-PRO-for-Toyota-Reiz-2015-15 (2)

Active-Hidden-Function-via-X431-PRO-for-Toyota-Reiz-2015-16 (2)

If you want to know more cases about Toyota, please refer to Toyota repair.


:: برچسب‌ها: X431 PRO ,
:: بازدید از این مطلب : 264
|
امتیاز مطلب : 4
|
تعداد امتیازدهندگان : 1
|
مجموع امتیاز : 1
تاریخ انتشار : سه شنبه 7 بهمن 1399 | نظرات ()
نوشته شده توسط : lily

Here we will show you how to active hidden function by X431 PRO for Toyota Reiz 2015.

Active-Hidden-Function-via-X431-PRO-for-Toyota-Reiz-2015-1 (2)

Function has been already tested on Toyota below:

1. Automatic padlock
2. Switch off the ignition about 30S/60S/120S Automatic padlock setting;
3 Press Remote control one time or twice to unlock setting.;
4. Luggage cover Settings;
5. The remote control shuts down all electric Windows;
6. The remote control opens all electric Windows;
7. ……

If you want to know more about X431 PRO, please click here: How to use launch X431.

Procedure:

Select“Toyota V48.42”above or VIN identification;
Select 16Pin diagnostic socket(European and other area)

Active-Hidden-Function-via-X431-PRO-for-Toyota-Reiz-2015-2 (2)

Select the automatic search

Active-Hidden-Function-via-X431-PRO-for-Toyota-Reiz-2015-3 (2)

Select after 2013.09

Active-Hidden-Function-via-X431-PRO-for-Toyota-Reiz-2015-4 (2)

Actual measurement car model is no smart key,select no smart key

Active-Hidden-Function-via-X431-PRO-for-Toyota-Reiz-2015-5 (2)

Read vehicle information

Active-Hidden-Function-via-X431-PRO-for-Toyota-Reiz-2015-6 (2)

Select system selection

Active-Hidden-Function-via-X431-PRO-for-Toyota-Reiz-2015-7 (2)

Select car body system

Active-Hidden-Function-via-X431-PRO-for-Toyota-Reiz-2015-8 (2)

Select BCM(Car Body Control System, main car body

Active-Hidden-Function-via-X431-PRO-for-Toyota-Reiz-2015-9 (2)

Select special function

Active-Hidden-Function-via-X431-PRO-for-Toyota-Reiz-2015-10 (2)

If select“Automatic Scan Special function”, This feature will automatically scan all options for personalized Settings for the diagnostic vehicle
If you select “all special functions”, this feature will display a warning message,The cue shows all the customization options for Toyota cars
Item, not all options are suitable for diagnostic models.

Active-Hidden-Function-via-X431-PRO-for-Toyota-Reiz-2015-11 (2)

Select customization

Active-Hidden-Function-via-X431-PRO-for-Toyota-Reiz-2015-12 (2)

Hidden functions display below:

Active-Hidden-Function-via-X431-PRO-for-Toyota-Reiz-2015-13 (2)
Active-Hidden-Function-via-X431-PRO-for-Toyota-Reiz-2015-14 (2)

Active-Hidden-Function-via-X431-PRO-for-Toyota-Reiz-2015-15 (2)

Active-Hidden-Function-via-X431-PRO-for-Toyota-Reiz-2015-16 (2)

If you want to know more cases about Toyota, please refer to Toyota repair.


:: برچسب‌ها: Launch X431 ,
:: بازدید از این مطلب : 271
|
امتیاز مطلب : 5
|
تعداد امتیازدهندگان : 1
|
مجموع امتیاز : 1
تاریخ انتشار : سه شنبه 7 بهمن 1399 | نظرات ()
نوشته شده توسط : lily

Background Information:

BMW Battery Registration vs. Coding

The registration procedure clears the charging history of the old battery and tells your BMW that a new battery with the same specs as the old battery is installed. The Engine Control Unit (DME) can charge the battery properly.

Battery Registration
Registration must be performed every time you change the battery on a 2002 and newer BMW. It lets the car know the battery installed is brand new.
If the new battery has the same specs or very close to the old battery (CCA, CA, Ah, battery type) no coding will be required.
Battery Coding
In addition to the registration procedure, you will need to carry out coding if you change the battery capacity or type. Coding is required if the new battery has different specifications compared to the old battery installed in the car.
For example, if you install a battery with a higher or lower cranking Ampere rating, or switch between Lead Acid and an AGM battery, you will need to code (program) the DME. Otherwise, the DME may overcharge or undercharge the new battery, and therefore shorten the life of the battery.

Some FAQs:

Q: Why do I need to register a new battery?
A: The short answer is that BMW designed the charging system with an algorithm that varies the rate of charge by the age and type of the battery installed. Registering a new battery resets the algorithm back to optimal charging voltage for the specified battery.

The long answer: “The negative battery cable has an electronic control unit on the battery end of it called an intelligent battery sensor (IBS). The IBS measures the state of battery charge and sends this information to the ECU. The ECU uses this information to control how much charging voltage is needed from the alternator to support vehicle electricity needs. A battery deteriorates normally over time and depending upon service demands and driving profile. The IBS reads this and the ECU tells the charging system to increase voltage and amperage output incrementally as the battery matures. Therefore, at battery replacement time, if you don’t tell the ECU it has a new battery it will overcharge the new battery causing it to wear out faster.

The registration process takes place in the ECU, which is the main player in this system. Also, when the IBS sees that battery voltage is too low for normal vehicle operation it can start shutting down vehicle functions to conserve power while keeping the vehicle operational. This would be accompanied by a check control warning of excessive battery discharge.”

Q: Why do I need to “code” for a new battery?
A: The answer to this varies. You may not have to! That is, so long as you replace your old battery with an exact replacement. However, if you switch from a wet-cell type battery to an AGM type battery, or vice versa, you must code for the change.

AGM and wet-cell batteries require a different rate of charge output from the alternator. Moving between these two types without coding can lead to over-charging or under-charging.
Also, batteries have a discharge rating called amp hours (ah). You must specify to the DME what the “ah” rating of your battery is so the car can run the proper charging algorithm.

Top BMW Battery Registration Scan Tools:

To complete the BMW battery registration process yourself, you will first need an OBD2 scanner that can perform BMW battery registration. Here is a list of popular scanners that you can use to register a new BMW battery.

Foxwell NT510/NT520/NT530 for BMW
One of the most popular BMW scanners. The tool can be used to register a new BMW battery with similar specs compared to the previous battery. Installing a new battery with significantly different specs requires coding which is not currently available on Foxwell NT510 at the time of testing.

BMW ISTA Rheingold
Require a laptop, ISTA software and hardware interface (BMW ICOM, K+DCAN, ENET cable etc).
Autel Scanners (MaxiSys, TS608MD808 Pro etc)
Professional Level Diagnostic Scanner. It can be used to program and code any type of battery including AGM and lead-acid, even if the replacement battery is significantly different than the original.

BMW INPA Software (INPA K+CAN)
Require a laptop and familiarity with INAP software. One of the cheapest scan tools able to register a BMW battery.
Carly App for BMW


:: بازدید از این مطلب : 227
|
امتیاز مطلب : 4
|
تعداد امتیازدهندگان : 1
|
مجموع امتیاز : 1
تاریخ انتشار : سه شنبه 7 بهمن 1399 | نظرات ()
نوشته شده توسط : lily

Background Information:

BMW Battery Registration vs. Coding

The registration procedure clears the charging history of the old battery and tells your BMW that a new battery with the same specs as the old battery is installed. The Engine Control Unit (DME) can charge the battery properly.

Battery Registration
Registration must be performed every time you change the battery on a 2002 and newer BMW. It lets the car know the battery installed is brand new.
If the new battery has the same specs or very close to the old battery (CCA, CA, Ah, battery type) no coding will be required.
Battery Coding
In addition to the registration procedure, you will need to carry out coding if you change the battery capacity or type. Coding is required if the new battery has different specifications compared to the old battery installed in the car.
For example, if you install a battery with a higher or lower cranking Ampere rating, or switch between Lead Acid and an AGM battery, you will need to code (program) the DME. Otherwise, the DME may overcharge or undercharge the new battery, and therefore shorten the life of the battery.

Some FAQs:

Q: Why do I need to register a new battery?
A: The short answer is that BMW designed the charging system with an algorithm that varies the rate of charge by the age and type of the battery installed. Registering a new battery resets the algorithm back to optimal charging voltage for the specified battery.

The long answer: “The negative battery cable has an electronic control unit on the battery end of it called an intelligent battery sensor (IBS). The IBS measures the state of battery charge and sends this information to the ECU. The ECU uses this information to control how much charging voltage is needed from the alternator to support vehicle electricity needs. A battery deteriorates normally over time and depending upon service demands and driving profile. The IBS reads this and the ECU tells the charging system to increase voltage and amperage output incrementally as the battery matures. Therefore, at battery replacement time, if you don’t tell the ECU it has a new battery it will overcharge the new battery causing it to wear out faster.

The registration process takes place in the ECU, which is the main player in this system. Also, when the IBS sees that battery voltage is too low for normal vehicle operation it can start shutting down vehicle functions to conserve power while keeping the vehicle operational. This would be accompanied by a check control warning of excessive battery discharge.”

Q: Why do I need to “code” for a new battery?
A: The answer to this varies. You may not have to! That is, so long as you replace your old battery with an exact replacement. However, if you switch from a wet-cell type battery to an AGM type battery, or vice versa, you must code for the change.

AGM and wet-cell batteries require a different rate of charge output from the alternator. Moving between these two types without coding can lead to over-charging or under-charging.
Also, batteries have a discharge rating called amp hours (ah). You must specify to the DME what the “ah” rating of your battery is so the car can run the proper charging algorithm.

Top BMW Battery Registration Scan Tools:

To complete the BMW battery registration process yourself, you will first need an OBD2 scanner that can perform BMW battery registration. Here is a list of popular scanners that you can use to register a new BMW battery.

Foxwell NT510/NT520/NT530 for BMW
One of the most popular BMW scanners. The tool can be used to register a new BMW battery with similar specs compared to the previous battery. Installing a new battery with significantly different specs requires coding which is not currently available on Foxwell NT510 at the time of testing.

BMW ISTA Rheingold
Require a laptop, ISTA software and hardware interface (BMW ICOM, K+DCAN, ENET cable etc).
Autel Scanners (MaxiSys, TS608MD808 Pro etc)
Professional Level Diagnostic Scanner. It can be used to program and code any type of battery including AGM and lead-acid, even if the replacement battery is significantly different than the original.

BMW INPA Software (INPA K+CAN)
Require a laptop and familiarity with INAP software. One of the cheapest scan tools able to register a BMW battery.
Carly App for BMW


:: بازدید از این مطلب : 235
|
امتیاز مطلب : 4
|
تعداد امتیازدهندگان : 1
|
مجموع امتیاز : 1
تاریخ انتشار : سه شنبه 7 بهمن 1399 | نظرات ()
نوشته شده توسط : lily


Obdstar odometer correction tools can help you greatly in mileage correction.This aryicle is compare their difference and similarities.

OBDSTAR-ODO-Master-VS-OBDSTAR-DP-Plus-VS-OBDSTAR-X300M-1

OBDSTAR Odo Master highlights:
*   tablet design:data graphing can be more visible
*   wider and newer vehicle coverage:more chances to repair diverse vehilces
*   online one-click update:save money and energy to keep updated
*   user-friendly on-screen instruction
*   read and write mileage via OBD

Difference:
Supported vehicle car list:: obdstar dp plus > obdstar Odo Master (only mileage correction) > obdstar x300m
Vehicle year coverage (from newest to older): obdstar dp plus = obdstar Odo Master > obdstar x300m

Price:  obdstar dp plus -600 usd
= obdstar Odo Master
=OBDSTAR X300M + 580usd

Notice:

OBDSTAR DP PLUS has 3 package.This comparision cites the price of Obdstar dp plus package A.

To check their difference,pease check the product overview:

OBDSTAR X300 PAD2 X300 DP Plus

Obdstar odo master has 3 version. This comparsion cites the price of Obdstar Obo Master Full version.

To know their difference ,please check my previous article:
Obdstar Odo Master Full/Standard/Basic Verison Comparision
Update: one – click upgrade:obdstar Odo Master = obdstar dp plus
obdstar x300m has less updates these days.

Similarities:

all are best OBD mileage programmer.

To make it easy to understand,the relation of these 3 products  can be shown below:

OBDSTAR-ODO-Master-VS-OBDSTAR-DP-Plus-VS-OBDSTAR-X300M-2

To check their support car list,please check below:

OBDSTAR-ODO-Master-VS-OBDSTAR-DP-Plus-VS-OBDSTAR-X300M-3


:: برچسب‌ها: OBDSTAR DP PLUS ,
:: بازدید از این مطلب : 231
|
امتیاز مطلب : 0
|
تعداد امتیازدهندگان : 0
|
مجموع امتیاز : 0
تاریخ انتشار : دو شنبه 15 دی 1399 | نظرات ()
نوشته شده توسط : lily

Even for the best vehicle diagnostic tools, errors are always hard to avoid. So people present some problems to us after they buy the GM Tech2. And today I wanna pick 3 main troubles here and give the answers to other people who have bought the tool.

The first question is that after you bought it, you may meet the condition that the TIS2000 software can’t be installed and no identification.

Don’t worry, if the TIS2000 you are trying to install has contained in the GM Tech2 software, then install the TIS2000 software is useless. To program electronic control unit, you would better buy an extra TIS2000 to work with the GM Tech2.

The second question is that find some errors after receiving the GM Tech2.
When you meet this trouble,the first thing you should check is that if it is blue screen. If it is, then just replace the Blue Screen Chip is ok. If it is not the problem of Blue screen, please send the seller the self-test report to check where the problem is. If you don’t know how to operate self test, you can consult the self-test manual at GM TECH2 “technical support / service”.

Once the tool starts to smoke, and even your car voltage become 14V from 12V when you use the GM Tech2 for the second times, please follow the right operation steps as what I say. Before you start diagnosing, please turn on the ignition and then connect the GM Tech2 with your vehicle, you would better test the voltage when the car starts , because during this process, a part of vehicle’s voltage will reach up to 24V or higher, especially for the vehicle which has a poor contact of electrical ground.


:: برچسب‌ها: gm tech2 ,
:: بازدید از این مطلب : 216
|
امتیاز مطلب : 0
|
تعداد امتیازدهندگان : 0
|
مجموع امتیاز : 0
تاریخ انتشار : دو شنبه 15 دی 1399 | نظرات ()
نوشته شده توسط : lily

The next generation of the J2534 GM Multiple Diagnostic Interface, or GM MDI 2(Fig. 1, right), offers increased processing power and security than the original MDI (Fig. 1, left) for faster programming speeds on current Global A vehicles as well as future Global B vehicles. The compact communication module is required in order to manage the transfer of data between a vehicle’s onboard network and a service technician’s PC.

The-Next-Generation-Multiple-Diagnostic-Interface-The-MDI-2-1

The MDI 2 supports diagnostic applications — GDS 2, Data Bus Diagnostic Tool, and Tech2Win — as well as Pass-Thru programming applications — TIS2Web–SPS.

Enhancements to the tool were based on technicians’ feedback on how they use the MDI and how to improve it. It replaces the first generation MDI, introduced in 2007, for Pass-Thru programming on current GM models. The MDI 2 is backward compatible, so it can be used to perform Pass-Thru programming on all vehicles built since 1996.

The MDI 2 connects to the vehicle via the J1962 connector using a new DLC cable. Connection between the GM Diagnostic Tool MDI 2 and the PC running the Global Diagnostic System 2 (GDS 2) software can be accomplished via standalone (USB), through a new Point-to-Point wireless Wi-Fi interface feature (a simple plug & play), or through the dealership network (Ethernet or wireless).

MDI 2 Kit

The EL-52100 MDI 2 kit includes:

*   MDI 2 Unit
*   SAE J1962 DLC Cable (Fig. 2)
*   10-ft. USB A to USB B Cable (Fig. 3)
*   Ethernet Cable
*   D-Link Wireless USB Adapters (Dongles) (Optional; for wireless connection)

The-Next-Generation-Multiple-Diagnostic-Interface-The-MDI-2-2
The-Next-Generation-Multiple-Diagnostic-Interface-The-MDI-2-3
The-Next-Generation-Multiple-Diagnostic-Interface-The-MDI-2-4

A DLC Cable Self-Test Loopback Adapter (Fig. 5) was sent to dealerships as an essential tool in December. It’s compatible with the MDI and MDI 2. It’s also sold separately through GM Dealer Equipment.

The adapter is used to test the DLC cable for open wires when used with the MDI Manager software. The adapter also can be used to power the MDI or MDI 2 on the workbench.

The-Next-Generation-Multiple-Diagnostic-Interface-The-MDI-2-5

MDI 2 connections
A. USB Port Type A
B. DB26 Connector (DLC Cable)
C. USB Port Type A
D. USB Port Type B – PC Connection Port
E. Wireless Adapter (Dongle)
F. Ethernet Port

The-Next-Generation-Multiple-Diagnostic-Interface-The-MDI-2-6

New Features
*   Wi-Fi Connection – The USB Wi-Fi adapter uses a USB dongle that enables Point-to-Point connections without the need for Wi-Fi SSID information or a wireless router.
*   USB Connection – Uses a new, more secure Type B connector and Ground Offset Failure protection. A wired connection is recommended for longer programming events.
*   Power Source – The MDI 2 is powered from the vehicle battery via the DLC Cable. It may also be powered over USB to perform firmware updates only using a PC.
*   Power Backup – Internal batteries that were used in case of a power interruption have been removed, which eliminates the possibility of old batteries corroding over time and damaging the unit. Capacitors maintain power during engine cranking, so operation is maintained.
*   Firmware Download – Uses USB 2.0 for faster firmware downloads instead of a separate AC power supply.
*   Future Expansion – Additional USB ports, an SD memory card slot and Function buttons are built into the unit for future enhancements.
*   Operating Temperature Range – The temperature range has been extended to -20° to 70°C (the MDI range was zero to 50° C).
*   DLC Cable – The DLC cable is twice as long as the previous cable and connects at the top, making it easier to use. The cable only connects to the MDI 2. A self-test adapter (accessed through the MDI Manager) can be used to test the integrity of the cable.

MDI Manager Software

The MDI Manager must be installed on the PC in order to configure, update and run diagnostic applications targeted for the PC.  Initially, use the MDI Manager software to set up the configuration of the MDI 2. The MDI Manager is also used to update the firmware on the MDI 2. Visit the TIS2Web/GlobalTIS website to determine if a newer version of MDI Manager software is available.

Wireless Dongle Setup

The first time the MDI 2 is used, the point-to-point USB dongle must be paired with the PC, which will install the necessary drivers on the computer. One dongle should be plugged into the PC and one into the MDI 2. The dongles are identical. Use either one for either connection. Remove the bottom dust cover to access the port.

TIP: Do not plug the dongle into a USB hub. It must be plugged directly into the computer.
The-Next-Generation-Multiple-Diagnostic-Interface-The-MDI-2-7

Connect the MDI 2 to the PC via the USB cable. After starting the MDI Manager, the Point-to-Point connection is automatically configured. The USB dongles are intended to stay plugged into the PC or laptop at all time. If it must be removed, safety eject it by right-clicking on the Windows USB icon in the bottom right toolbar on the computer.

Dealerships considering new purchases should look into the MDI 2 for its many new advantages The original MDI will continue to be supported, but will not work on future Global B models.


:: بازدید از این مطلب : 234
|
امتیاز مطلب : 0
|
تعداد امتیازدهندگان : 0
|
مجموع امتیاز : 0
تاریخ انتشار : یک شنبه 7 دی 1399 | نظرات ()